I use Windows 8.1 Professional as my primary operating system but routinely work on projects that cannot be easily run on Windows. One of the projects that I’m currently working on, Founders’ Pulse, has the following instructions for developing on Windows:
Getting node and npm
- Install node.js from here
- Right click on “This PC” or “My Computer”, go to Advanced System Settings and edit Environment Variables
- Add this to your PATH: C:\Users\yourusername\AppData\Roaming\npm;C:\Program Files\nodejs
- The first path might already be there, the second is neglected by the installer as of this time of writing
- Close and open your terminals. Commands like npm and node should now work.
- Install Python 2.7.3
- Install Visual Studio 2012 Express
- Install Windows SDK
- Install Visual C++ 2008 Redistributables
- Install OpenSSL
- Go to the pulse app directory and run npm install –msvs_version=2012
Seems a little crazy especially considering that the Linux instructions are so much simpler:
$ npm install

$ npm install nodemon -g

$ nodemon server.js
While setting up the development tools on Windows would work – it is a lot more work and time consuming than doing it on Linux, especially when considering that each project on Windows has its own set of hoops to jump through. The best solution for me is a VM – and because I’m using Windows 8.1 Pro, it would be the most efficient to use Microsoft Hyper-V for virtualization. Configuration is a little tricky because Hyper-V is designed for server virtualization (a constant Ethernet connection), not for being installed on a laptop (Wi-Fi card with constantly changing connections).
I’m not going to go through the basic Hyper-V setup here – just explain the changes needed to make this work correctly.
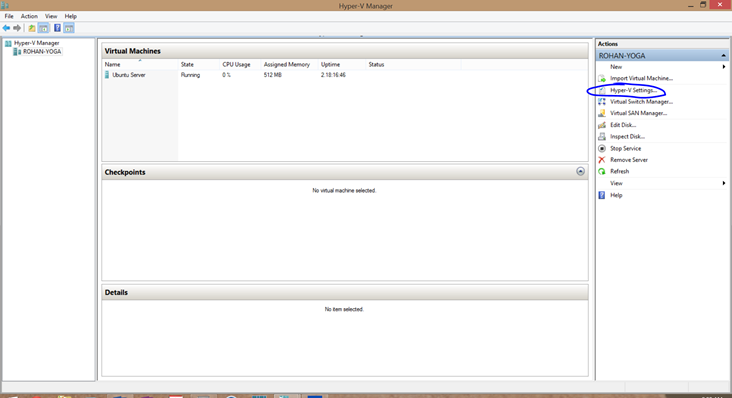
- We need to add an additional virtual switch to Hyper-V. We can do this by typing “Hyper-V Manager” at the start screen and then opening it.
-
Click on Hyper-V Settings in the upper-right pane.
-
Add two virtual switches with the “Internal Only” connection type. Name them different things. I named one “Internal LAN” and the other “External LAN”.
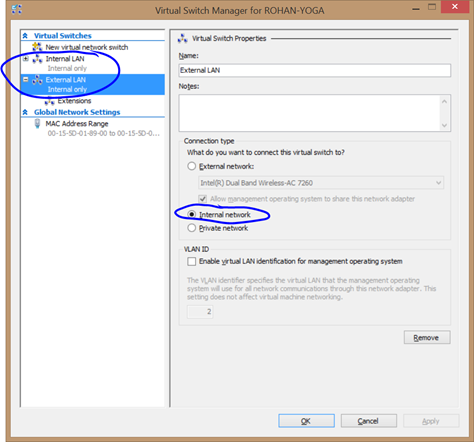
- Press “OK” and save changes to the network configuration.
-
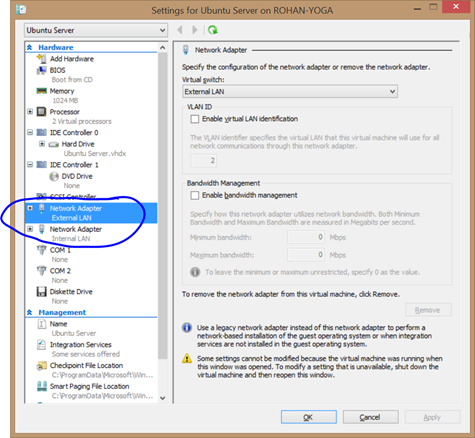
Edit your VM to have a network card attached to each of the virtual switches.
-
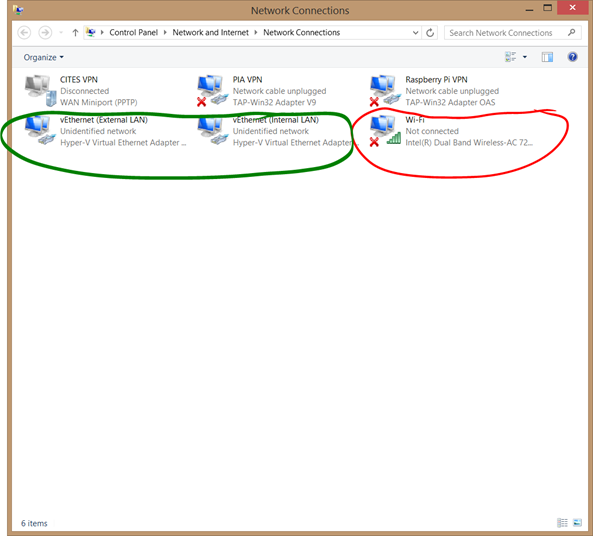
Save those settings and then open network connections in the control panel. You should see your normal Wi-Fi card (I circled mine in red) and the new virtual switches from Hyper-V (I circled mine in green). You may have other connections there (I have several for connecting to different VPNs) but this shouldn’t affect them.
-
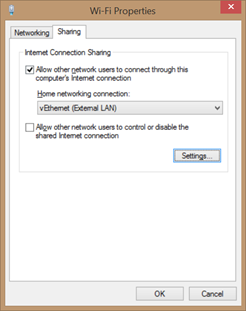
Right click “Wi-Fi” and click on “Properties”, switch to the “Sharing” tab and check the “Allow other network users to connect through this computer’s internet connection” box. In the dropdown below, select the virtual switch you designated for the external network.
- Configure a static IP on the same subnet for your internal connection on both Windows and your VM. I’m not going to go into detail here about that as it varies significantly based on distribution.
- (Optional) – configure hostname resolution to your VM on Windows through the hosts file. This allows you to connect to your VM via a hostname even when offline. The file is located at C:\Windows\System32\drivers\etc\hosts
This leads a nice, unified development environment. From my text editor (Sublime Text 2), I can open and edit any of the files on the VM as if they were stored on Windows through the Sublime SFTP plugin. On file open, Sublime SFTP automatically syncs the file with the VM and does so again at any save point. This allows me to have my terminal open in the background, edit any file from the VM, save them and then have them ready for immediate execution through the terminal. The best part is that it works anytime, anywhere, with or without an external network connection.