Tag Archives: development

Setting up an Ubuntu VM for Development on Microsoft Hyper-V with Wi-Fi

I use Windows 8.1 Professional as my primary operating system but routinely work on projects that cannot be easily run on Windows. One of the projects that I’m currently working on, Founders’ Pulse, has the following instructions for developing on Windows:

Getting node and npm

  • Install node.js from here
  • Right click on “This PC” or “My Computer”, go to Advanced System Settings and edit Environment Variables
  • Add this to your PATH: C:\Users\yourusername\AppData\Roaming\npm;C:\Program Files\nodejs
  • The first path might already be there, the second is neglected by the installer as of this time of writing
  • Close and open your terminals. Commands like npm and node should now work.

Compiling native modules

Seems a little crazy especially considering that the Linux instructions are so much simpler:

$ npm install
$ npm install nodemon -g
$ nodemon server.js

While setting up the development tools on Windows would work – it is a lot more work and time consuming than doing it on Linux, especially when considering that each project on Windows has its own set of hoops to jump through. The best solution for me is a VM – and because I’m using Windows 8.1 Pro, it would be the most efficient to use Microsoft Hyper-V for virtualization. Configuration is a little tricky because Hyper-V is designed for server virtualization (a constant Ethernet connection), not for being installed on a laptop (Wi-Fi card with constantly changing connections).

I’m not going to go through the basic Hyper-V setup here – just explain the changes needed to make this work correctly.

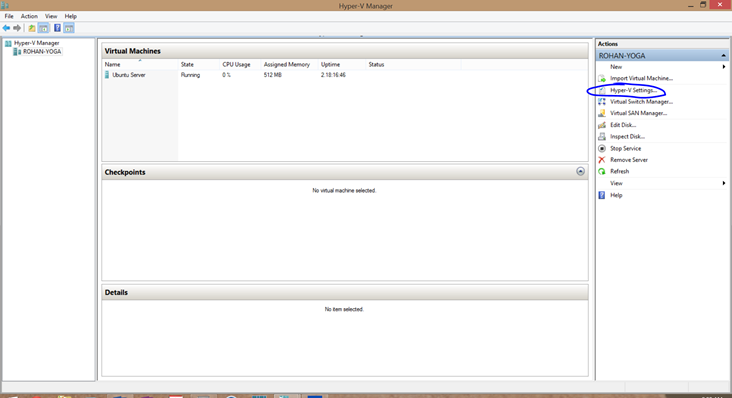
  1. We need to add an additional virtual switch to Hyper-V. We can do this by typing “Hyper-V Manager” at the start screen and then opening it.
  2. Click on Hyper-V Settings in the upper-right pane.


  3. Add two virtual switches with the “Internal Only” connection type. Name them different things. I named one “Internal LAN” and the other “External LAN”.


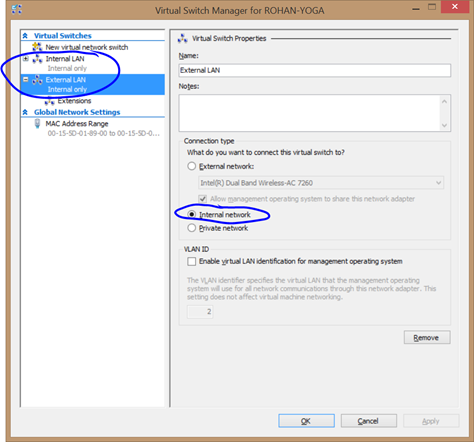
  4. Press “OK” and save changes to the network configuration.
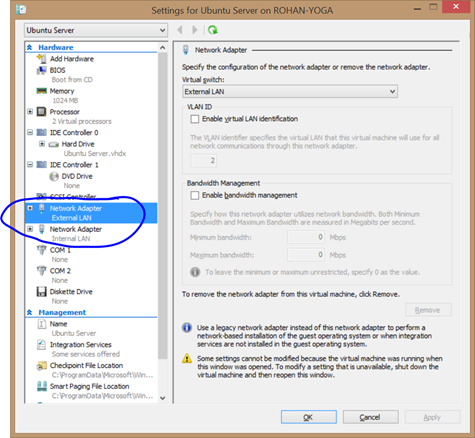
  5. Edit your VM to have a network card attached to each of the virtual switches.


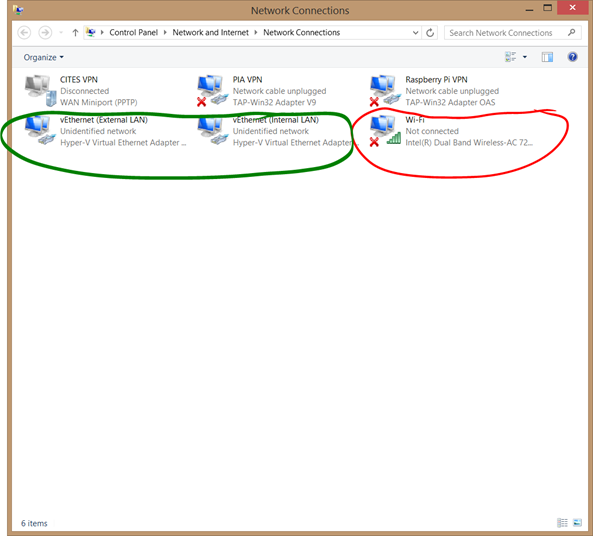
  6. Save those settings and then open network connections in the control panel. You should see your normal Wi-Fi card (I circled mine in red) and the new virtual switches from Hyper-V (I circled mine in green). You may have other connections there (I have several for connecting to different VPNs) but this shouldn’t affect them.


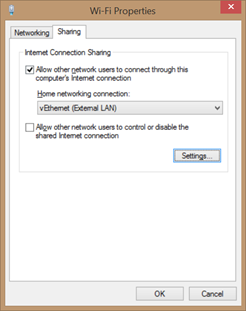
  7. Right click “Wi-Fi” and click on “Properties”, switch to the “Sharing” tab and check the “Allow other network users to connect through this computer’s internet connection” box. In the dropdown below, select the virtual switch you designated for the external network.


  8. Configure a static IP on the same subnet for your internal connection on both Windows and your VM. I’m not going to go into detail here about that as it varies significantly based on distribution.
  9. (Optional) – configure hostname resolution to your VM on Windows through the hosts file. This allows you to connect to your VM via a hostname even when offline. The file is located at C:\Windows\System32\drivers\etc\hosts

This leads a nice, unified development environment. From my text editor (Sublime Text 2), I can open and edit any of the files on the VM as if they were stored on Windows through the Sublime SFTP plugin. On file open, Sublime SFTP automatically syncs the file with the VM and does so again at any save point. This allows me to have my terminal open in the background, edit any file from the VM, save them and then have them ready for immediate execution through the terminal. The best part is that it works anytime, anywhere, with or without an external network connection.

Custom Paper Deployment Tool Updated to 1.2.2.1

I pushed out an update to Custom Paper Deployment Tool today with updated template files. All 32 of the template PDF files have been regenerated with a new process to lighten them. On consumer laser printers, this should now make a significant difference, making the dots much lighter as well as making it much easier to see the template in the background. In testing done, there has been no effect to recognition with the Smartpens. This change affected only the PDF files – you will not have to redeploy the AFD files. Unfortunately, due to the security certificate expiring, it is possible that you may have to uninstall the installed version and then install the new version instead of directly updating. I have taken steps to ensure this won’t happen again.

Thanks for using Custom Paper Deployment Tool!

On Hackathons – Facebook Chicago Regional Hackathon

Last November (November 2, 2012) was Facebook’s first ever Chicago Regional Hackathon (hosted at UIUC). The week before, a group of us from UIUC (David, Jay, Xander, and myself; all freshman in CS) decided that we were going to participate and hopefully build something! Now two months after the Hackathon, as we’re looking through the code we wrote then, we notice a lot of interesting patterns. But first lets start at the beginning… 48 hours before the Hackathon was set to begin, we realized we still didn’t have any idea of what we were going to build. We met briefly as a team to brainstorm and decided that we would all have to come up with ideas during the next two days and then decide at the Hackathon itself. 24 hours before the Hackathon, we still hadn’t come up with anything and I was starting to get worried that we wouldn’t have anything by the time we were supposed to start. But luck was on our side – with just about 5 hours to go before the official start time, Jay came up with something awesome. While walking around the Siebel Center for Computer Science, he had seen this poster for a Microsoft Tech Talk about the Surface tablet:

After seeing the poster, he wanted a way to remember it and didn’t want to manually type in all the information in to his Google Calendar. And suddenly we had an awesome Hackathon project – make an Android app that lets you take a picture of an event flyer and have it enter the details onto the phone’s default Calendar. After a little bit of thought about how we would get the picture through OCR software, we began setting up our dev environments.

Three of us had to setup Eclipse 4.2 (Juno) with Github access and the Android SDK. Just the Android SDK download itself takes close to an hour per computer (We were compiling for Android SDK version 16 with minimum SDK version 8). Unlike the rest of us, Xander prefers to develop from his Arch Linux environment (which for some reason couldn’t install the ADT plugin for Eclipse). This left him in his preferred environment anyways (emacs). With just an hour to go before the hackathon, we had everything setup to build our Android App and began to move our gear over to the Siebel Center.

One of the smartest things we did was bring all of the gear we thought we would need. We brought our own power strip, ethernet cables, and a 5 port network switch. This ended up being one of the smartest decisions we made as we had a rock solid internet connection (needed to keep pulling/pushing from Github) while other groups were struggling with the Wi-Fi (500 consistent users does tax any Wi-Fi implementation). As I was working with my Lenovo X120e (11.6″ screen, 3 lbs), I decided to bring along my 20″ external monitor as well as my Logitech Mouse and Keyboard combo. This too was an excellent decision as I was able to comfortably work with two screens (code editor on the 20″, documentation and debugging on the laptop display) for the entire period.

With everything ready to go, we watched as the Facebook team went over their intro, picked up a whole bunch of snacks, and then we were coding! Having decided to use the Tesseract OCR Library (specifically this wrapper for Android), Xander and I got to work understanding how to implement it while Jay and David worked through the Android tutorials to build a simple “Hello World” app and build the custom views we would need from there.

By the time Facebook had dinner rolling, we had managed to get the Tesseract Android Tools project compiled (as an NDK project – it required some special compiling), and communicating with a basic, one button app. For the next few hours after dinner, we worked to write the necessary code to take a picture on Android (using the camera API), import a picture (using the gallery API) and then send it to Tesseract for processing.

As we were coding away, Facebook staff was raffling away all sorts of nice gear in the IRC chat. I ended up winning a Facebook t-shirt (in addition to the standard Facebook Hackathon t-shirt)!

After the midnight sandwiches, Xander and David took a nap while Jay and I wrote out the functions that would add information to the calendar. We decided to try to simplify the OCR’ing that Tesseract had to do by providing it with a “box” at a time of data to process. This made sense for our application as we could just have the user draw a box around the fields that were needed in the calendar. We wrote out all of the code to draw the boxes and then scale that up to the actual picture but were not able to get Tesseract to correctly process the contents of a box. In fact, in all of our attempts, Tesseract threw some sort of exception, killing the entire app and making a mess of things.

Around breakfast time (8 AM – 5 hours till submissions), we decided to pull the plug on the project. We were at a point where Tesseract gave us inconsistent output when we provided it with an entire image and crashed out when we tried to segregate parts of the image only for processing. There was no way that we were going to be able to get any better results in the time remaining. We were all exhausted – it had been a very long night and we knew were not going to be able to get any further in the time remaining. As a team, we decided that we were done, dragged our gear back to the dorms and slept.

We learned that Tesseract is a rather temperamental software. Providing it with the exact same picture (through the gallery import) returned different results each time we tried it. Testing the same image on different hardware (Google Nexus 7, Sony Xperia Ion, Motorola Atrix II, Google Nexus One) resulted in different results as well. To date we are utterly perplexed at how Tesseract can possibly be functional considering how much difficulty we had with its results and how inconsistent it is. To be honest, we’re not sure if the problem is Tesseract or the wrapper written to use it in Android applications. More than likely, it is a simple exception that needs to be caught and dealt with instead of thrown. It is highly likely that we missed one of the optional arguments that adds some more stability.

Looking back, we took on a very ambitious project for a hackathon in an area that none of us had any familiarity. This was a mistake. We lost a lot of time trying to understand the basic Android workflow (even though only half the team was working on it). We were in over our head with Tesseract – we just didn’t have the familiarity with the API to build something useful.

I can tell you that we’re not finished yet! We’re cautiously optimistic that given enough time we can learn the nuances of Tesseract to get proper output. We have a few other image manipulation tricks we still want to try such as converting the image to gray scale before passing it to Tesseract. Sooner or later we will get back to this project and eventually it will be finished.

Overall, I thought the Hackathon was a very worthwhile experience. I had a lot of fun working under pressure, trying to bring this whole project together. Even though the end result is technically a failure, I don’t see it that way. It is a great stepping stone in our journey as software developers and a learning experience on rapid group projects. We did parts of it well (pulling a team together and setting up all of the collaboration tools) and didn’t do so well in other parts (picking a doable project), but in the end we learned from it and that’s what really matters. At our next hackathon (We’re going to Mhacks), at least we won’t make the same project definition mistakes.

Tools I Use: S3 Browser

Disclaimer: NetSDK Software provided me with a free Professional License of S3 Browser as I am a freeware developer in exchange for an unbiased review. I was going to publish a review anyway but when I was given a Professional License, I modified it to include the additional unlocked features. However, my original thoughts and feelings about S3 Browser have not changed.

With the release of Custom Paper Deployment Tool last August, my server was flooded with users trying to download it. If you have used Custom Paper Deployment Tool at all, you know that it is a fairly hefty program with more than 500 MB of required files (This is due to the 32 PDF Notepads included within). My VPS (Virtual Private Server) with 384 MB of RAM and a 100 mbps network connection was unable to cope with the stress. I was forced to restart the server once per hour and the vast majority of users were unable to successfully download the program as the Apache Web Server would cut the connection when it got overwhelmed.

Needless to say, this was not a viable solution at all! As I was searching for something cost effective with the scalability needed to handle the load spikes when many people want to download Custom Paper Deployment Tool at once, I remembered that I had been playing with Amazon’s S3 (part of the AWS platform) and that it was designed to do exactly that! After verifying that S3 would allow me to utilize Microsoft’s ClickOnce deployment technology, I next needed a way to reliably move 500 MB of data to S3 and update it as necessary.

At first, I looked at S3Fox a FireFox extension I had used back when I still used FireFox. However, I was not thrilled with the idea of firing up FireFox (in addition to Google Chrome, my daily-use browser).

This led me to look for desktop clients for Amazon S3 and the two that I tried were CloudBerry Lab’s CloudBerry Explorer for Amazon S3 & NetSDK Software’s S3 Browser. After trying out both of them, I decided to use to S3 Browser primarily because I preferred it’s user interface and it felt more comfortable to use (at least to me). I disliked Cloudberry Explorer’s dual pane approach (local and remote storage) as it led to confusion during my informal testing. S3 Browser allows me to upload the files I need to quickly, efficiently and reliably.

The freeware version allows you to transfer 2 files simultaneously to Amazon S3 while the Professional version eliminates that restriction and allows you to transfer as many files simultaneously as your internet connection will support. S3 browser easily allows the creation of new buckets and completely and simply manages your entire Amazon S3 account.

S3 Browser has been the perfect solution I have been looking for. So far, I have published several updates of Custom Paper Deployment Tool to S3 after testing them locally and each time S3 Browser has quickly and efficiently uploaded the relevant files to Amazon.

I would most definitely recommend S3 Browser to anyone who needs to quickly move files to and from Amazon S3. I have attached a comparison table showing the differences between S3 Browser’s Free and Professional versions as provided by NetSDK Software.

Provided by NetSDK Software

Video: Introduction to Custom Paper Deployment Tool

Over the last couple of hours, I put together a quick little demonstration of the functionality available in Custom Paper Deployment Tool. This video walk through will take you from starting Custom Paper Deployment Tool, to deploying Custom Paper and retrieving diagnostic information from your Livescribe Smartpen!

Livescribe, We Want The Developer’s Program Back!

As most of us know, back in July 2011, Livescribe closed their Developer’s Program citing a change in company policy aligning them with a new cloud initiative.

As of July 29th, Livescribe will close its third-party developer program. With cloud technology and mobile information access becoming increasingly important to our customers, Livescribe is realigning its focus and resources on cloud access, storage and services. Our recent introduction of Livescribe Connect, which enables customers to easily send notes and audio, as a pencast PDF, to people or destinations of their choice like Google Docs, Evernote, email, and Facebook, is an important step in this direction.

Applications in our online store will remain available for download and purchase pending compatibility with future Livescribe software updates. We will continue to accept applications submitted for publishing in our online store, as well as pattern credit requests through July 22nd. At this time, the SDKs and developer website will no longer be available. If your application is close to completion and you would like to have it posted in our store, please contact us at[email protected] for support.

We greatly appreciate the time, effort and support you have given to Livescribe and our platform over the past three years.

Thank you again for your contributions.

Sincerely,

Joyce & Michael, Livescribe Developer Programs Team

Byron Connell, Livescribe CMO

The full announcement is available on Livescribe’s website here: http://www.livescribe.com/errors/developer.html As one of the major custom paper developers, I was rather disappointed with Livescribe’s decision as Livescribe’s platform is one that I have greatly enjoyed developing for. I get between 4-5 thousand page views a month on this website and at least half of those are from people who are interested in using my custom paper products. Within the weeks that followed, I saw many, many forum posts, emails, and comments on this website all filled with one message:

I’m a new Smartpen user. Now that Livescribe’s closed the Developer Program, is it over? Am I too late to join in and use Custom Paper?

The preceding is my paraphrased version of several Private Messages sent to me through the Livescribe Forums. Unfortunately a recent forum overhaul has prevented me from accessing any of those Private Messages and I was forced to paraphrase from my memory. At first, I was forced to tell them that yes, they were too late. But that soon changed with the release of my Custom Paper Deployment Tool. Since then, I have been getting many requests from users to develop different kinds of custom paper including music staff paper and I have been forced to tell them that I cannot simply because I do not have access to any additional pattern license. I have been directing users to this thread on Livescribe’s Get Satisfaction page: http://getsatisfaction.com/livescribe/topics/tommy-1l7gjj and asking them to add their voices to the people asking Livescribe to bring the Developer’s Program back. Jeff, a member of Livescribe’s customer support team is working internally to make sure that people inside Livescribe know that we want this. If you want the Developer’s Program back, which will allow the creation of additional applications and custom paper products, please go here: http://getsatisfaction.com/livescribe/topics/tommy-1l7gjj and tell Livescribe that! The more people that voice this sentiment, the greater the chance that Livescribe will listen to us and bring back the Developer’s Program.

Custom Paper Deployment Tool Updated

Since my last release of my Custom Paper Deployment Tool (now hosted on Amazon’s S3 Platform), I have made a series of changes to the tool as I have been preparing for the next major release (available now). These changes include new features, cosmetic fixes, as well as major changes to the tool’s code to increase reliability and stability as well as increase performance while running the tool. I’ll go more in-depth about these changes below.

New Features

  • Today I am happy to announce that using the “File” –> “Open” menu options, users can manually select .afd files and deploy them using my Custom Paper Deployment Tool. Under the “Open” menu there are two options “File” and “Folder”. “File” allows users to deploy .afd files one at a time. However, if you have a directory full of files and want to install all of the .afd inside it at once, you can use the “Folder” option to select the directory with the files in it, and it will install all of them at once.
  • The “Tools” –> “Smartpen” –> “List Installed Packages” function has been enabled and is now functioning. This allows users to connect their smartpen and view a complete list of all installed packages on their smartpen. This includes all Livescribe packages as well as all custom packages.
Cosmetic Fixes
  • The bottom of the main screen now shows the current status of deployment as the tool is deploying the .afd files. Previously, it only displayed the last file deployed.
  • I noticed several minor visual issues with the interface of the spawned windows when a user selects an option under “Tools” –> “Smartpen” including button and text field placement. Basically, the text field continued on underneath the button which led to a problem when large amounts of text were placed in the field and the user was unable to scroll all the way down to view it. Those errors have been corrected.
  • I found that the check boxes required selecting the text and then selecting the check mark itself (a full two step process). This has been replaced with a single click to either the check mark or the box itself to select it, significantly decreasing the number of clicks when deploying all of the notepads.
  • I have replaced modified the “Tools” –> “Smartpen” –> “View Smartpen Data” screen to format the user set time in a human readable format. Previously, it simply provided the number of milliseconds that had passed since Unix Epoch Time (Midnight on 1/1/1970 UTC). This number is now formatted correctly to show both date and time in a way that human-readable text. I have also removed the RTC (Real Time Clock) displayed on the same screen. This shows the milliseconds that have elapsed from the smartpen’s creation. I removed this because it provided no useful information. As far as I know, it is only used to calculate the user set time.
Performance & Reliability Tweaks
  • I’ve enabled multi-threading to allow the tool to process multiple actions simultaenously which increases it’s efficiency and stability. Each window now uses it’s own thread to allow background windows to continue processing while another window is open in the foreground. This also allows the main screen to display the current status at all times, even while deploying .afd files.
  • My main reasoning for not enabling the “List Installed Packages” function in version 1.0.x.x was that it took an insanely long time to list the data (over 10 minutes) and was constantly polling the smartpen while doing so. I’ve reworked that code so that it pulls the data from the smartpen once and then parses it quickly, while displaying the results in the window. This function is now enabled.
  • Previously, Custom Paper Deployment Tool required that users connect their smartpens after starting the program though it should have found any connected smartpens as it started up. I found a bug within the initialization routine that ran that part of the program in the wrong order resulting in the bug. This has been fixed and from now on, Custom Paper Deployment Tool correctly detects smartpens that have been connected before it starts up.
  • If there are no boxes checked, the deploy button will disable itself to prevent crashing the program by attempting to deploy nonexistent notepads.
All in all, this is a very major release with a couple of new features, as well as many cosmetic and non-cosmetic bug fixes. It’s a rather hectic time for me so I’m thrilled that I was able to get this update out as quickly as I did. I’m looking forward to seeing your thoughts on the update!

Update to Problems with Downloading my Custom Paper Deployment Tool

I know there have been severe problems with DNS (provided for free by http://xname.org) as well as web server overloads so I have finally setup deployment using Amazon’s S3 service for reliability and stability. The link on the download page has been updated to reflect that change. If you have a working copy of the download, it is not required that you uninstall and reinstall using that link, but it is recommended so that you automatically get future updates.

I would also like to note that as of now: http://xname.org DNS is now back in sync with all three of their DNS servers so my domains are routing correctly now. The plan is to eventually setup cname records to push out a new update (or two) with a seamless transition for user back to the install.rohankapoor.com install domain while still hosting on Amazon’s S3 platform. This should be seamless with an estimated 3 updates to the Custom Paper Deployment Tool. If you have not downloaded the new version since I changed the url, it is recommended that you do so, so as to not miss the updates.

Problems Downloading Custom Paper Deployment Tool

Recently I’ve talked about a new tool I’ve released for Livescribe Smartpens, my Custom Paper Deployment Tool, which allows users (running Windows) to deploy any of my custom papers (and soon any other custom paper) to any Livescribe Smartpen now that the Development Program has officially ended and Livescribe will no longer support Custom Paper and third-party development.

I’ve noticed that many users are having problems connecting to the download page (http://install.rohankapoor.com) and have traced the problem with it. The DNS servers I use, run by http://xname.org are having a replication problem and the primary DNS server is serving the correct data while the secondary DNS server is serving incorrect data that is two months out of date. As far as I know, XName is aware of the problem and will hopefully have a fix soon. I’ve also noticed much higher load on my web-server as the download files are quite large and the demand is quite high.

The solution appears to be providing an alternate download location (which I will probably use Amazon’s S3 service for). Unfortunately, I am currently quite far from the my development computer and will be unable to modify the manifest file to change that location until I return. I can recommend trying to use Google’s DNS (8.8.8.8) until I am able to resolve this as it is bringing more accurate results. I apologize for the delay.

Announcement: Custom Paper Deployment Tool

With the end of Livescribe’s Development Program, it is no longer possible for end users (or even developers) to download the SDK and deploy any of the numerous Custom Paper Products made by developers such as myself (among others). For a while now, I have been discussing the possibility of Livescribe creating and releasing a tool that installs third party Custom Paper Products to their smartpens. For various reasons, none of which will be discussed here, Livescribe did not release such a tool. I have been toying with the idea of building one myself for the last year, however I have not done so assuming that Livescribe will at some point do so. At this point, with Livescribe closing their Developer Program, it is obvious that they will not be releasing such a tool now.

The other reason I was hesitating with building this tool was that it would be coded in C# which I have had zero experience coding in before. I’m primarily a Java programmer with experience with both C++ and PHP (all of which use very similar syntax). Seeing no tool forthcoming from Livescribe and not wanting Custom Paper Products to be a product of the past (no pun intended), I finally dove right into it! I During this process, I learned that C# is nowhere near as complicated as I feared and most of the Syntax still applies from C++. With minimal googling, I was able to build a fully functional Custom Paper Deployment Tool using Microsoft Visual Studio 2010 as my Integrated Development Environment (IDE).

Please note that the Custom Paper Deployment Tool is not supported by Livescribe in any way, shape or form. As the Developer Program has ended, this tool is not associated with it at all. There is no warranty (either explicit or implicit) on the tool. I do not take any responsibility if anything adverse were to happen to your smartpen because of my tool. By going to the bottom of the page and clicking-through to the installer page, you agree to the terms and conditions listed above.  This tool is available freely to all users by following the download link at the bottom of the page.

You can download the current version (1.0.0.13) from the Custom Paper Deployment Tool homepage. Further information regarding Custom Paper Deployment Tool is available there. Along with the Custom Paper Deployment Tool, I am today releasing eight 150 page Lab Notebooks along with eight 25 page Unlined Notepads. Simultaneously, I have increased the number of all notepads to eight of each type. Stay tuned for their individual release pages coming up along with individual download links. The download for Custom Paper Deployment Tool includes all of the files needed to deploy and print all 32 of these Notepads so there is no need to download them individually anymore! As with all of my Livescribe related downloads, Custom Paper Deployment Tool is compatible with both Echo and Pulse Smartpens.