Tag Archives: Ubuntu

Setting up an Ubuntu VM for Development on Microsoft Hyper-V with Wi-Fi

I use Windows 8.1 Professional as my primary operating system but routinely work on projects that cannot be easily run on Windows. One of the projects that I’m currently working on, Founders’ Pulse, has the following instructions for developing on Windows:

Getting node and npm

  • Install node.js from here
  • Right click on “This PC” or “My Computer”, go to Advanced System Settings and edit Environment Variables
  • Add this to your PATH: C:\Users\yourusername\AppData\Roaming\npm;C:\Program Files\nodejs
  • The first path might already be there, the second is neglected by the installer as of this time of writing
  • Close and open your terminals. Commands like npm and node should now work.

Compiling native modules

Seems a little crazy especially considering that the Linux instructions are so much simpler:

$ npm install
$ npm install nodemon -g
$ nodemon server.js

While setting up the development tools on Windows would work – it is a lot more work and time consuming than doing it on Linux, especially when considering that each project on Windows has its own set of hoops to jump through. The best solution for me is a VM – and because I’m using Windows 8.1 Pro, it would be the most efficient to use Microsoft Hyper-V for virtualization. Configuration is a little tricky because Hyper-V is designed for server virtualization (a constant Ethernet connection), not for being installed on a laptop (Wi-Fi card with constantly changing connections).

I’m not going to go through the basic Hyper-V setup here – just explain the changes needed to make this work correctly.

  1. We need to add an additional virtual switch to Hyper-V. We can do this by typing “Hyper-V Manager” at the start screen and then opening it.
  2. Click on Hyper-V Settings in the upper-right pane.
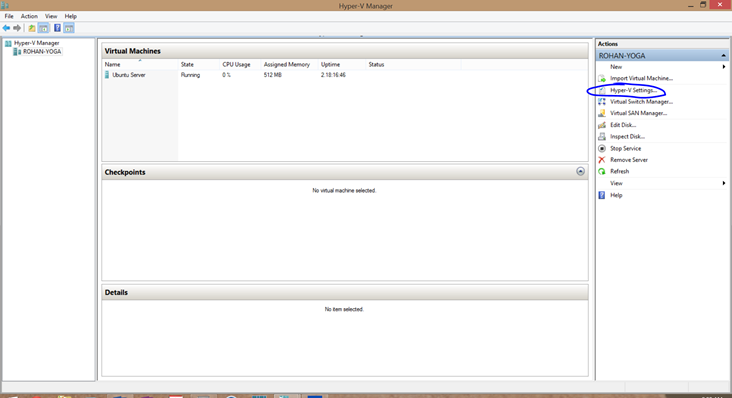


  3. Add two virtual switches with the “Internal Only” connection type. Name them different things. I named one “Internal LAN” and the other “External LAN”.
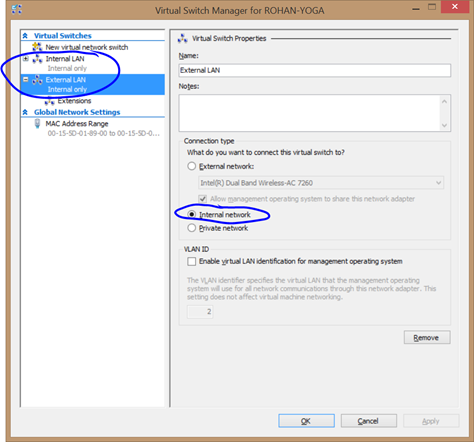


  4. Press “OK” and save changes to the network configuration.
  5. Edit your VM to have a network card attached to each of the virtual switches.
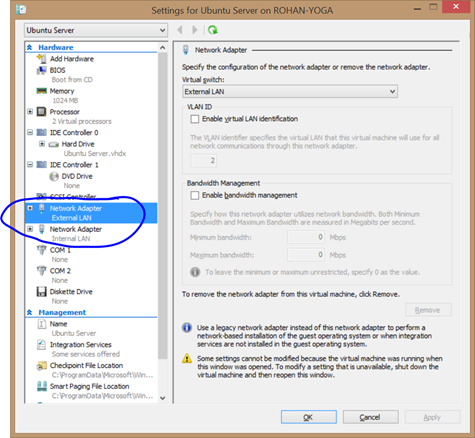


  6. Save those settings and then open network connections in the control panel. You should see your normal Wi-Fi card (I circled mine in red) and the new virtual switches from Hyper-V (I circled mine in green). You may have other connections there (I have several for connecting to different VPNs) but this shouldn’t affect them.
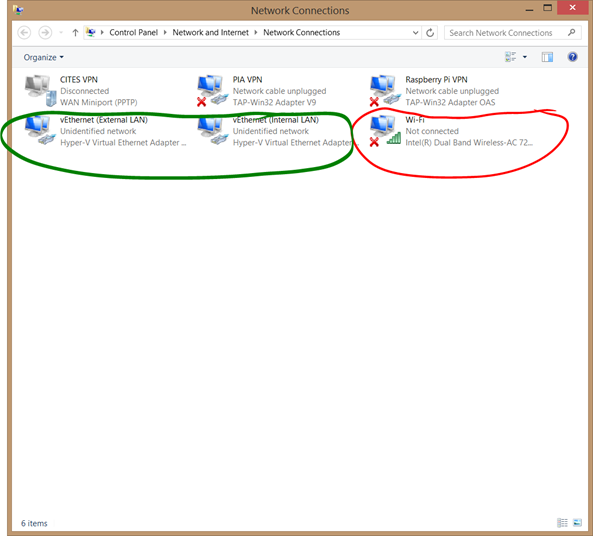


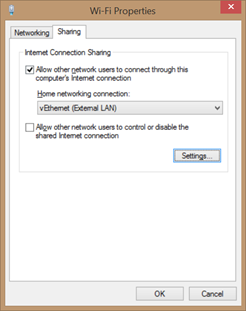
  7. Right click “Wi-Fi” and click on “Properties”, switch to the “Sharing” tab and check the “Allow other network users to connect through this computer’s internet connection” box. In the dropdown below, select the virtual switch you designated for the external network.


  8. Configure a static IP on the same subnet for your internal connection on both Windows and your VM. I’m not going to go into detail here about that as it varies significantly based on distribution.
  9. (Optional) – configure hostname resolution to your VM on Windows through the hosts file. This allows you to connect to your VM via a hostname even when offline. The file is located at C:\Windows\System32\drivers\etc\hosts

This leads a nice, unified development environment. From my text editor (Sublime Text 2), I can open and edit any of the files on the VM as if they were stored on Windows through the Sublime SFTP plugin. On file open, Sublime SFTP automatically syncs the file with the VM and does so again at any save point. This allows me to have my terminal open in the background, edit any file from the VM, save them and then have them ready for immediate execution through the terminal. The best part is that it works anytime, anywhere, with or without an external network connection.

Switching from WordPress MU to WordPress

For almost a year now, I ran a WordPress MU site with BuddyPress, and bbPress, all running the latest bleeding-edge SVN releases. Unfortunately, I soon learned that this is not an easy task at all. Bleeding-edge releases, while fun and full of new features are very disaster prone. In the process of fixing things,  other things break and then, it’s just not a happy application. The amount of time I spent fixing things, searching how to fix things, and scratching my head because I just couldn’t fix things was just too much. Obviously, running bleeding-edge software on a production site isn’t the best of ideas.

I was unable to keep up with the updates and eventually the sites just died. Some programs on the Virtual Private Server insisted on filling up the virtual hard drive with lots and lots of statistical data. Unfortunately, statistical data on several dead websites is hardly useful at all. Once the virtual drive was full the server basically destroyed itself. Isn’t that just lots of fun?

After several months and several domain expiries, I decided it would make sense to get rid of a testing ground and only keep production sites. I reasoned that if a testing ground was needed, it would be easy enough to build on my local virtualbox setup of Ubuntu 8.04 LTS Server Edition. I reloaded the VPS with CentOS 5 and happily was greeted with an empty hard drive again. Last time, my VPS was running Kloxo from LXLabs. Unfortunately, after the great HyperVM and Kloxo vulnerabilities of 2009, I was very wary with installing Kloxo again. It also had the “great” statistical tendencies.

I decided to install Webmin and it’s module virtualmin for administration because I have used it before and it is a truly much better alternative to Kloxo. Virtualmin, though has a paid version, however, in my experience, the GPL one works just fine. Admittedly, I do know my way around Linux and could easily run all of these commands through an SSH terminal but it’s much easier to just use a web-based control panel.

The install was quick and painless, just a simple bash script that needed execution and everything was working fine. I logged in to Virtualmin, created a new account for this domain, after modifying features per domain and set up was complete. I simply had to install WordPress and then upload modified sections of my database from the WordPress MU install. From there, it was simply configuring permissions, installing plugins, setting themes, and embedding functions.

In an afternoon’s work, I managed to backup all of my data from WordPress MU, BuddyPress, and bbPress, reload my Virtual Private Server, install a new control panel, set up new DNS with XNAME, and restore my backups to WordPress (Single User). Hopefully here, problems will be virtually non-existent and with some luck, everything should work for good this time.

Review: Refurbished Logitech MX Revolution!

The Logitech MX Revolution (left) has been called, “The World’s Most Advanced Mouse!” by Logitech as well as many other third party reviewers such as myself. I’m inclined to agree to with them even after just a couple of weeks with the mouse.

I bought the MX Revolution refurbished off of eBay because I really don’t feel like spending $80 on a new mouse. EvenLogitech MX Revolution if it was going to Revolutionize my mousing. I ended up getting a fairly decent deal on it and purchased it (refurbished) for $40.

Honestly, would I say the functionality of the MX Revolution justifies it’s steep price. Yes! I would. It’s many buttons, dual wheels, and fancy look, as well as ergonomic design definitely justifies it. There are so many buttons on the thing that I still haven’t found a use for around 3 of them yet! The mouse if obviously built for right-handed people and as such it works perfectly for me.

I’m primarily an Ubuntu user and as such was expecting to be given a hard time by Logitech. However, I was pleasantly surprised when everything just worked. I love the charger and the lithium-ion battery is amazing. I only have to charge it once a week.

Needless to say, I’m very, very impressed with what Logitech has come up with and will continue to be a user.

Is Google Trying to Replace My Phone Company?

At first it sounds ludicrous, doesn’t it? Google trying to replace phone companies? The concept sounds kind of crazy. That’s what I thought too… until I did a little bit more research. And honestly speaking, I too have gotten a Google Voice number!

Google Voice is one of Google’s latest endeavors. Their philosophy is not one phone number per device, but rather one phone number per person. It’s an amazing philosophy and the results are pretty damn impressive! Google Voice is currently a private beta and is invitation only. An invitation is also rather hard to obtain for those of us without friends already using Google Voice. I emailed a few of mine and a couple hours later, I was the proud recipient of a Google Voice invitation! I signed up and decided to give it a whirl.

Currently, in terms of phone services, I have a home phone number (powered by Vonage) as well as a cellular device, the Sony Ericsson Xperia X1 with AT&T as the service provider. I love the fact that Vonage emails me transcriptions of my voice messages and allows me to listen to them from the web-based interface. Unfortunately, AT&T does not. This means that my voice messages are in two different places and makes things much harder to look for. My main reason for looking into Google Voice was so that I could get all of my messages transcribed and emailed to me. It makes life much easier when all of your messages come to one inbox!

As part of the Google Voice signup process, I had to choose my new “Google Number”, effectively this is just a standard phone number powered by Google Voice! Here’s the cool part, it allows me to have free national calling as well as extremely low rates to most countries. Not quite as low as Vonage but still much lower than AT&T! The beauty of it is that whenever anyone calls my new Google Number, it will automatically ring both my Vonage phone and my Xperia X1 and whichever one I answer with will take the call. Of course, there is a boatload of other features that Google Voice offers as well and all of them are truly amazing solutions! Best of all Google Voice is free! You can view the full feature list here.

After looking through Google Voice and all of it’s features it seems that Google has the infrastructure set up to successfully replace my phone company. Unfortunately for them, they were unable to buy the airwave space that they required in order to become a cellular phone company. For now however, I don’t see Google Voice replacing my phone companies but rather working along with them to add features and functionality at low cost. In the future, however, I could definitely see Google replacing my phone company with Google Voice and I would guess that they would do a brilliant job at it. I for one would be willing to pay Google for the service, though I do prefer free over fee any day.

For a beta product, Google Voice certainly is a very impressive service. It’s something you notice with Google a lot. All of their products that are considered beta or even pre-alpha are very good quality. Honestly speaking their beta products are a lot of time better than paid products from other companies! In fact, I’m writing this from Google Chrome for Linux unstable on Ubuntu 9.04. That means pre-alpha stage. Guess what? In the two months that I’ve been using it, the only thing it can’t do is print successfully — something that Google warned me about before I installed Chrome for Linux. It’s something I do rarely as it is and if I ever do need to print, it doesn’t take too much effort to fire up Mozilla Firefox and print from there.

Ubuntu 9.10 Karmic Koala Officially Released!

While I haven’t had time to test it out for myself yet, I am aware that the all new Ubuntu 9.10 was officially released today! As many of you should know, if your reading this, that Ubuntu is literally the best open-source operating system available today. The best part of it is that Ubuntu has and always will be free!

Ubuntu is an African word meaning ‘Humanity to others’, or ‘I am what I am because of who we all are’. The Ubuntu distribution brings the spirit of Ubuntu to the software world.

The Ubuntu team has really done a great job here. From every release of Ubuntu, they have been true to the official Ubuntu philosophy. The free price tag doesn’t hurt either!

Anyways, I’m downloading 9.10 Desktop from the torrent and right now, it’s taken about 10 minutes and is already 75% done. Here’s the link to the torrent!

I’ll probably end up running an install or an upgrade by this weekend, and then I’ll be sure to let all of you guys know, how it is!!

Stay tuned for more about Ubuntu 9.10 | Karmic Koala!

Crazy Keyboard Glitches!

I pride myself on keeping a nice neat, and clean keyboard. As such I was shocked when the number pad on my external Logitech Wireless Internet suddenly stopped working! However it appears I shouldn’t have worried.

A quick google and look what I found: http://geekozoid.blogspot.com/2008/06/number-pad-numeric-keypad-not-working.html

Basically you need to:

Click on System->Preferences->Keyboard
Open Mouse Keystab.
Uncheck “Allow to control the pointer using the keyboard”

and then it works perfectly! Thanks GeekoZoid!

Changing Screen Saver Options on Ubuntu 9.04

For all the user benefits it offers, Ubuntu seems to lack a lot in the Screen Saver options. Sure there may be hundreds of them to choose from but any user of windows (argh) can tell you that any good screen saver is supposed to have user configurable options. At first glance, it appears that Ubuntu doesn’t have any screen saver options. I have to admin I was flabbergasted. Of course, I turned to my favorite tool, Gnome DO to search google. Interestingly enough, It turned out that the software used for screen saver is Gnome Screensaver with no config options. However you can install xscreensaver and use it to configure the options for gnome-screensaver. Seems a little roundabout for my liking but it works.