Category Archives: Computers

Building a “Red Alert” Button for Artemis

Recently, a group of friends and I discovered Artemis Spaceship Bridge Simulator, a 4-6 person PC game that lets you command and run a starship while working through missions. It’s a game made for Star Trek fans with realistic gameplay and a great plot. In terms of equipment needed, it has fairly low requirements: one computer for each crewmember (networked) and one “server” to run the main screen and keep all the other computers in sync with the game. It’s a really engaging game and each gameplay session lasts for hours. As this is a simulator, I have been working on several projects to make the gameplay more immersive.

One of those is making a physical “red alert” button, which when pressed triggers the red alert in the game causing all of the lighting to switch to a pulsing red and a klaxon to sound. For the button, I used a large “emergency stop” button that fit into a standard one gang outlet box. Due to size constraints, I used an Arduino Nano as it wanted everything to fit inside the outlet box with just a USB cable coming out. This made a little tricky to interface with Artemis because the game only accepts keyboard/mouse input (no API) and the Arduino Nano cannot directly send keypresses to a computer.

I came up with a quick workaround, sending serial data from the Arduino to a C# console application which would use Microsoft’s InputSimulator library to send the keypresses. It’s not as elegant a system as I originally hoped for, since it requires client software but it works well and adds more to the experience. If you want to build your own button, I’ve provided instructions and software on GitHub.

Circuit Diagram

Image 1 of 3


Migrating Specific Folders from Subversion to Git

First a bit of background: I’m currently a sophomore studying Computer Science (CS) at the University of Illinois at Urbana-Champaign (UIUC). In all of our CS classes, we use Subversion to submit our labs and programming assignments (referred to as MP’s). For convenience for the professors and teaching assistants there is a separate folder within the class repository for each student to submit their work. Effectively, that folder is our individual repository: we check it out it once and then continue to update and check in files throughout the semester. In my personal use, I prefer to use Git and it makes sense to convert the entire repository to git before archiving it.

Fortunately this has gotten rather easy to do in the last couple of years, but there is a step that I always forget because I want to migrate a specific folder instead of a whole repository. I’m documenting this procedure for myself so it is possible that it won’t work exactly as written with your specific Subversion setup.

Credits: I’d like to thank John Albin and SleePy for providing me with the various pieces I needed to get this working.

  • First, we need to get the list of all committers from Subversion’s logs. This can be achieved with John Albin’s handy little regex:

    svn log -q | awk -F '|' '/^r/ {sub("^ ", "", $2); sub(" $", "", $2); print $2" = "$2" <"$2">"}' | sort -u > authors-transform.txt

That will grab all the log messages, pluck out the usernames, eliminate any duplicate usernames, sort the usernames and place them into a “authors-transform.txt” file.

  • We need to edit each line in that file to add the rich metadata that Git expects from it’s committers. For example, convert:

    rkapoor = rkapoor

    into:

    rkapoor = Rohan Kapoor <[email protected]>

  • Next, we use git svn to clone the specific directory from the repository.

    git svn clone http://example.com/svn/project/folder --no-minimize-url --no-metadata -A authors-transform.txt folder

    The --no-minimize-url makes sure that git svn only clones the specific directory without trying to clone the root of the repository.

  • Finally (optional), we can add a remote to the git repository and push it out to a remote provider like GitHub or Bitbucket.

    git remote add origin ssh://[email protected]/path/to/your/repo

    git push origin

Let’s Talk About Backups

Note: This happened in mid-March of 2013. It’s taken me two months to get it all written out in a way that maintains coherency.

I store all of my data on a 1TB internal 3.5″ hdd inside my custom-built Desktop. Between photos, videos, and all sorts of other files, my storage needs increase at a rate of around 100GB per year. Around February, I dropped under 30GB of free space on my data drive and began looking at solutions to increase the capacity of my “D Drive” in Windows without having to split my data across logical volumes or purchasing a larger capacity disk. The solution: using Windows 8 Storage Spaces functionality. The Simple Storage Space works similarly to Windows Home Server’s Drive Extender in that additional hard drives can just be added to the machine and they will immediately be able to be used to add additional space.

Lucky for me, I had a spare 1TB e-sata drive sitting at home and over spring break, brought it back with me. The plan was simple – but as always with technology, Murphy’s Law trumps all. I started by connecting the e-sata drive and having Windows provision it as a member of a new Storage Pool. I then told it to create a Simple Storage Space with 2 TB of space. Due to thin-provisioning I was able to do this with only a single hard drive installed. By design, a Simple Storage Space does not have any resiliency built in (something Windows informs you when you try to create it). I then transferred all 1TB of data from the internal drive to the external drive.

Here was the first mistake: I did not have a second copy of this data on site. This took several hours over a Sata II connection. I then wiped the source drive (the internal 1TB drive), and then added it to the Simple Storage Space. I set Storage Spaces to “optimize” across the two drives and then started a Bitlocker encryption run on the new “D” drive. This indicated that it would take several hours (most likely all night), so I turned off my monitors and went to bed.

Mistake #2: I never did disable the very large and bright blue/purple led on the external drive. I had however, made sure that it was pointing as far away from my roommate’s bed as possible. So Monday morning rolls around and the blizzard on Sunday night has guaranteed us a snow day. It looks like it’s going to be a great day.

Unfortunately, after breakfast I discover that Murphy’s law has struck again. In hindsight, it’s glaringly obvious that this will end disastrously – considering that I went to bed with a large blinking led light on and no local backup of my data. It turns out that in the middle of the night, my roommate was bothered by the blinking led light and attempted to turn the drive further away from him. Unfortunately, the way he turned it, he managed to flip the power switch, turning off the drive, and disconnecting it from the Storage Space while Bitlocker was still in the process of encrypting it. When I got there in the morning and discovered this, Storage Spaces had a large error balloon indicating a missing drive and Bitlocker had crashed during it’s encryption run.

I was still cautiously optimistic at this point, hoping that after connecting up the drive again, Storage Spaces would recover and Bitlocker would continue encrypting. Alas, this was not to be. Connecting the drive back up caused Storage Spaces to remount the drive but the contents were not readable at all. A Google search regarding Bitlocker drives being disconnected while encrypting was not promising. A Microsoft KB suggested trying the Bitlocker Repair Tool but it was very unlikely that it would be able to help me.

In an instant I had just lost 1TB of data. Two careless mistakes were all it took for disaster to strike.

Thankfully I wasn’t totally out of luck because I had been using Backblaze to automatically back up my data in real time since June of last year. With my home internet connection, I literally ran my computer 24/7 for 3 months to get all of my data backed up and stored encrypted in their datacenter. Their service automatically backs up everything (not including program files) for $5 a month.

I contemplated using their direct download method of downloading backups for a while – but with 1TB of data to download, it was simply not feasible, regardless of the number of little pieces I broke it into and the number of people I got to the download it. It would have taken 10 of us close to four days nonstop and I couldn’t in good couscous bother that many people for that long. The option I ended up using was the USB Hard Drive Restore at a cost of $189.

By Friday morning (at 9:00 AM), I got a package notification from the front desk. I was surprised as packages don’t usually come in until 5:00 PM – but was very glad to see my 1TB drive from Backblaze. The drive shipped in a branded USB 2.0 enclosure (which unfortunately limited transfer speeds), but I was not going to take anymore chances with my data by trying to move the drive to a USB 3.0 enclosure.

I had decided that I needed a local, onsite backup as well and had purchased a 4 TB Seagate Backup Plus USB 3.0 external hard drive for local backup purposes. This would be used for two purposes. 2TB was dedicated to being a direct copy of my Storage Space created by Microsoft’s Synctoy utility every night before I went to bed. The other 2TB would be used with Windows 8’s File History to provide a version-by-version backup. By the time I went to bed that night, I had successfully copied all of my data back onto my Storage Spaces drive, restarted BackBlaze and begun its checksum matching process, encrypted the Storage Spaces drive, as well as created a local backup to the (now encrypted) 4TB drive.

A couple of weeks later, I purchased a second one of the 4TB drives with the purpose of leaving it at home and swapping it with the one in my dorm room every time I went home.

My current backup strategy consists of the following: All data exists on the 2TB storage space within my Desktop. Anything school related is stored in Dropbox. My photos are backed up to a 1TB WD My Passport Portable USB 3.0 that is always in my backpack. Everything is backed up in real time to Backblaze. A second copy of my data is always with my computer on one of my 4TB drives. A third copy of all of my data is at home.

I now have at least 4 copies of all of my data (including the original) which should prevent me from (hopefully) ever going through a situation like what happened in March. I’m extremely lucky that I didn’t lose anything permanently. And I’m very happy that Backblaze was able to do exactly what I’m paying them for: recover my data when I lost it.

On Hackathons – Facebook Chicago Regional Hackathon

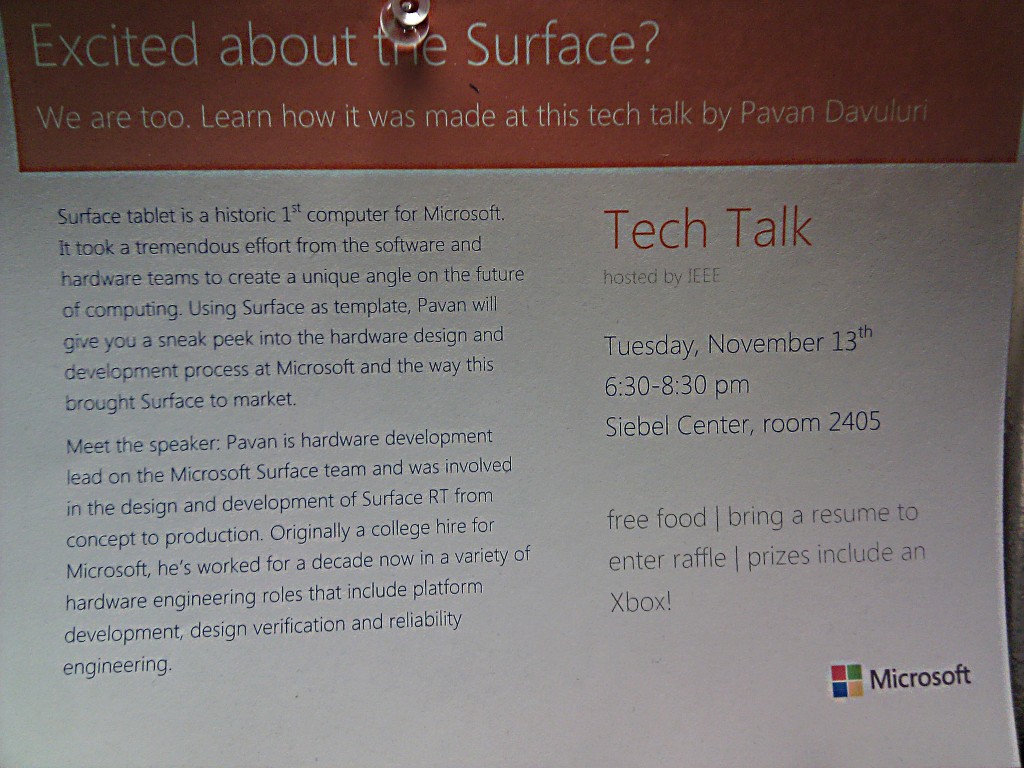
Last November (November 2, 2012) was Facebook’s first ever Chicago Regional Hackathon (hosted at UIUC). The week before, a group of us from UIUC (David, Jay, Xander, and myself; all freshman in CS) decided that we were going to participate and hopefully build something! Now two months after the Hackathon, as we’re looking through the code we wrote then, we notice a lot of interesting patterns. But first lets start at the beginning… 48 hours before the Hackathon was set to begin, we realized we still didn’t have any idea of what we were going to build. We met briefly as a team to brainstorm and decided that we would all have to come up with ideas during the next two days and then decide at the Hackathon itself. 24 hours before the Hackathon, we still hadn’t come up with anything and I was starting to get worried that we wouldn’t have anything by the time we were supposed to start. But luck was on our side – with just about 5 hours to go before the official start time, Jay came up with something awesome. While walking around the Siebel Center for Computer Science, he had seen this poster for a Microsoft Tech Talk about the Surface tablet:

After seeing the poster, he wanted a way to remember it and didn’t want to manually type in all the information in to his Google Calendar. And suddenly we had an awesome Hackathon project – make an Android app that lets you take a picture of an event flyer and have it enter the details onto the phone’s default Calendar. After a little bit of thought about how we would get the picture through OCR software, we began setting up our dev environments.

Three of us had to setup Eclipse 4.2 (Juno) with Github access and the Android SDK. Just the Android SDK download itself takes close to an hour per computer (We were compiling for Android SDK version 16 with minimum SDK version 8). Unlike the rest of us, Xander prefers to develop from his Arch Linux environment (which for some reason couldn’t install the ADT plugin for Eclipse). This left him in his preferred environment anyways (emacs). With just an hour to go before the hackathon, we had everything setup to build our Android App and began to move our gear over to the Siebel Center.

One of the smartest things we did was bring all of the gear we thought we would need. We brought our own power strip, ethernet cables, and a 5 port network switch. This ended up being one of the smartest decisions we made as we had a rock solid internet connection (needed to keep pulling/pushing from Github) while other groups were struggling with the Wi-Fi (500 consistent users does tax any Wi-Fi implementation). As I was working with my Lenovo X120e (11.6″ screen, 3 lbs), I decided to bring along my 20″ external monitor as well as my Logitech Mouse and Keyboard combo. This too was an excellent decision as I was able to comfortably work with two screens (code editor on the 20″, documentation and debugging on the laptop display) for the entire period.

With everything ready to go, we watched as the Facebook team went over their intro, picked up a whole bunch of snacks, and then we were coding! Having decided to use the Tesseract OCR Library (specifically this wrapper for Android), Xander and I got to work understanding how to implement it while Jay and David worked through the Android tutorials to build a simple “Hello World” app and build the custom views we would need from there.

By the time Facebook had dinner rolling, we had managed to get the Tesseract Android Tools project compiled (as an NDK project – it required some special compiling), and communicating with a basic, one button app. For the next few hours after dinner, we worked to write the necessary code to take a picture on Android (using the camera API), import a picture (using the gallery API) and then send it to Tesseract for processing.

As we were coding away, Facebook staff was raffling away all sorts of nice gear in the IRC chat. I ended up winning a Facebook t-shirt (in addition to the standard Facebook Hackathon t-shirt)!

After the midnight sandwiches, Xander and David took a nap while Jay and I wrote out the functions that would add information to the calendar. We decided to try to simplify the OCR’ing that Tesseract had to do by providing it with a “box” at a time of data to process. This made sense for our application as we could just have the user draw a box around the fields that were needed in the calendar. We wrote out all of the code to draw the boxes and then scale that up to the actual picture but were not able to get Tesseract to correctly process the contents of a box. In fact, in all of our attempts, Tesseract threw some sort of exception, killing the entire app and making a mess of things.

Around breakfast time (8 AM – 5 hours till submissions), we decided to pull the plug on the project. We were at a point where Tesseract gave us inconsistent output when we provided it with an entire image and crashed out when we tried to segregate parts of the image only for processing. There was no way that we were going to be able to get any better results in the time remaining. We were all exhausted – it had been a very long night and we knew were not going to be able to get any further in the time remaining. As a team, we decided that we were done, dragged our gear back to the dorms and slept.

We learned that Tesseract is a rather temperamental software. Providing it with the exact same picture (through the gallery import) returned different results each time we tried it. Testing the same image on different hardware (Google Nexus 7, Sony Xperia Ion, Motorola Atrix II, Google Nexus One) resulted in different results as well. To date we are utterly perplexed at how Tesseract can possibly be functional considering how much difficulty we had with its results and how inconsistent it is. To be honest, we’re not sure if the problem is Tesseract or the wrapper written to use it in Android applications. More than likely, it is a simple exception that needs to be caught and dealt with instead of thrown. It is highly likely that we missed one of the optional arguments that adds some more stability.

Looking back, we took on a very ambitious project for a hackathon in an area that none of us had any familiarity. This was a mistake. We lost a lot of time trying to understand the basic Android workflow (even though only half the team was working on it). We were in over our head with Tesseract – we just didn’t have the familiarity with the API to build something useful.

I can tell you that we’re not finished yet! We’re cautiously optimistic that given enough time we can learn the nuances of Tesseract to get proper output. We have a few other image manipulation tricks we still want to try such as converting the image to gray scale before passing it to Tesseract. Sooner or later we will get back to this project and eventually it will be finished.

Overall, I thought the Hackathon was a very worthwhile experience. I had a lot of fun working under pressure, trying to bring this whole project together. Even though the end result is technically a failure, I don’t see it that way. It is a great stepping stone in our journey as software developers and a learning experience on rapid group projects. We did parts of it well (pulling a team together and setting up all of the collaboration tools) and didn’t do so well in other parts (picking a doable project), but in the end we learned from it and that’s what really matters. At our next hackathon (We’re going to Mhacks), at least we won’t make the same project definition mistakes.

Configuring the Raspberry Pi as an AirPrint Server

As a $35 pc with very low power requirements, the Raspberry Pi is uniquely suited to serve many different purposes especially as an always-on low power server. When I first heard of the Pi, I was excited because I wanted it to become an AirPrint Server. This allows Apple’s iOS line of devices to print to the Raspberry Pi which then turns around and prints to your regular printer via CUPS. I used my network laser printer for this, but there is no reason why you couldn’t use a hardwired printer (over USB) on the Pi itself. About a month ago, I succeeded. Last week, I put up a video demonstrating it, and today, I bring you the long-promised tutorial so that you can set it up yourself.

I’d like to thank Ryan Finnie for his research into setting up AirPrint on Linux and  TJFontaine for his AirPrint Generation Python Script.

For the purpose of this tutorial, I used PuTTY to remotely SSH into my Raspberry Pi from my Windows 7 running Desktop PC.

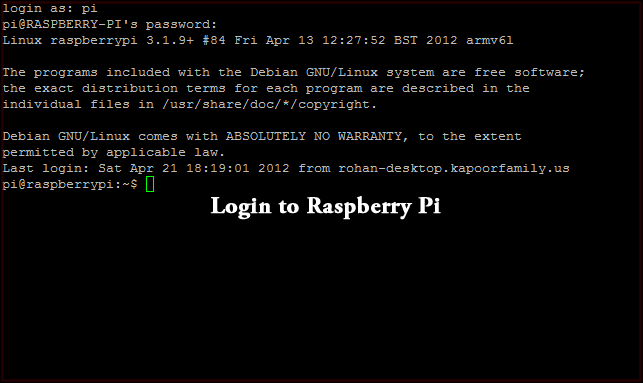
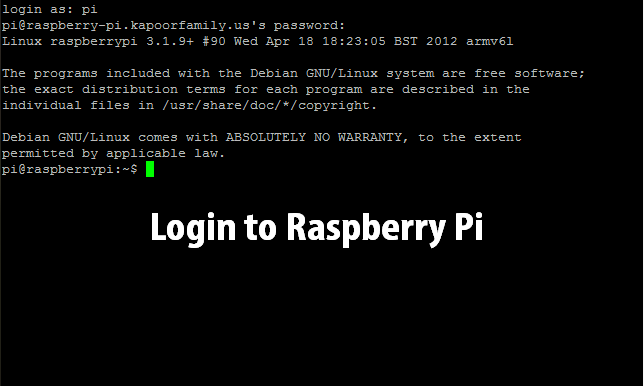
To begin, let’s login to the pi which uses the username pi and password raspberry.
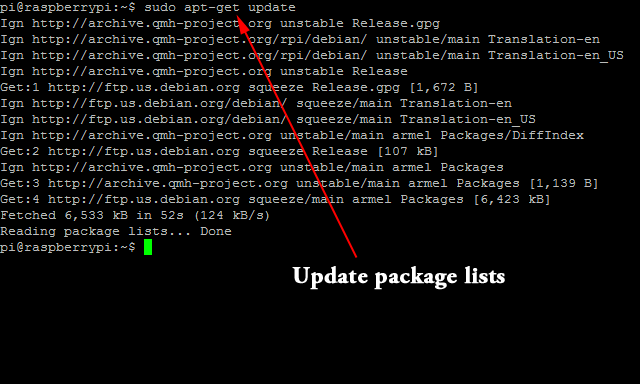
We now have to install a whole bunch of packages including CUPS and Avahi. Before we do this, we should update the package repositories as well as update all packages on the Raspberry Pi. To update the repositories, we type in the command sudo apt-get update.
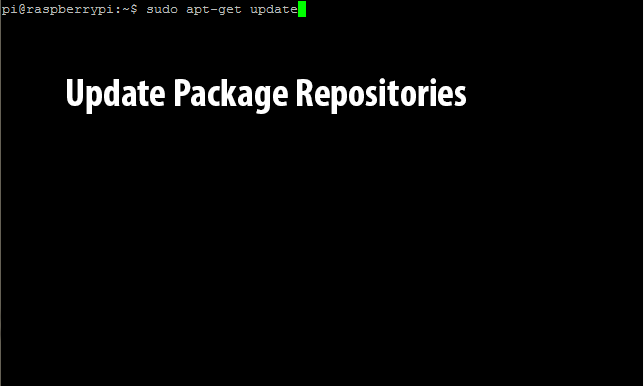
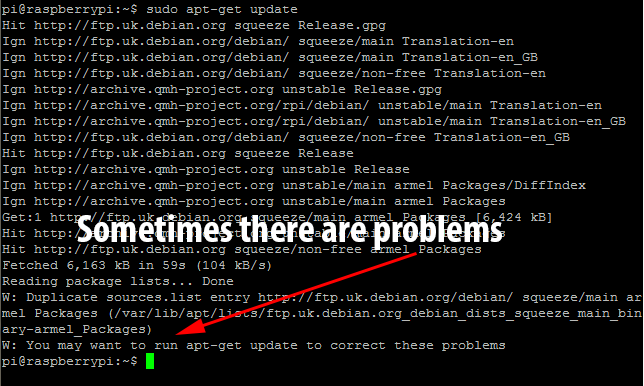
Naturally, this doesn’t quite work as expected, ending with an error requesting another package update. If you get this error just type in sudo apt-get update again.
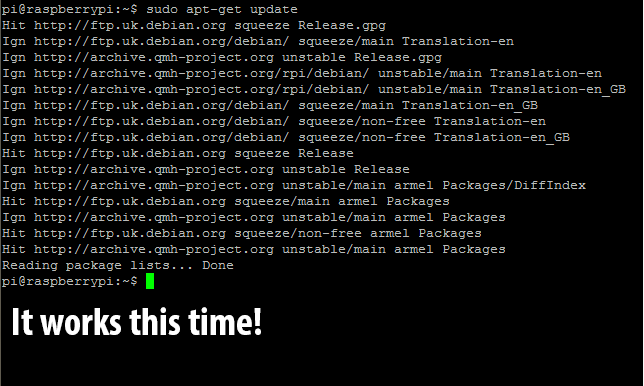
It seems the second time is the charm!
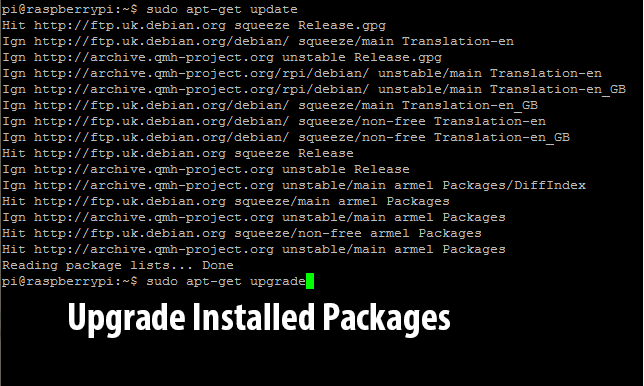
Now we need to upgrade the packages installed on the Pi using the new repository information we’ve just downloaded. To do this, we type in sudo apt-get upgrade.
This will generate a list of packages to install and will then request approval before continuing. Just type in y and press enter to let it continue.
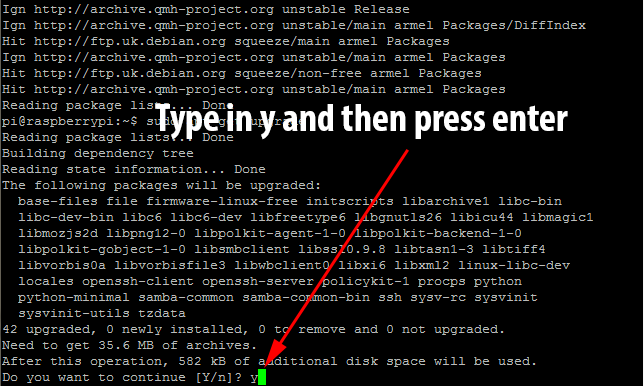
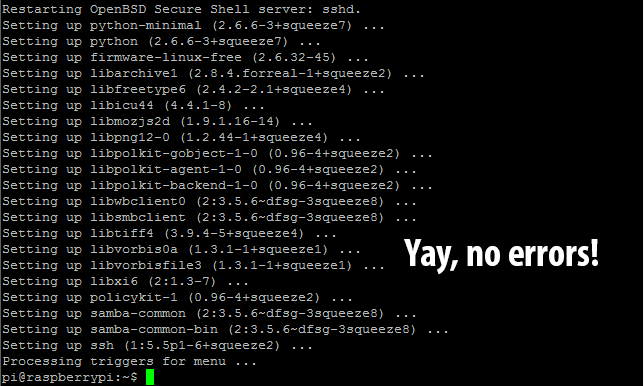
This will take a few minutes as it downloads and installs many packages. Eventually you will be returned back to a bash prompt.
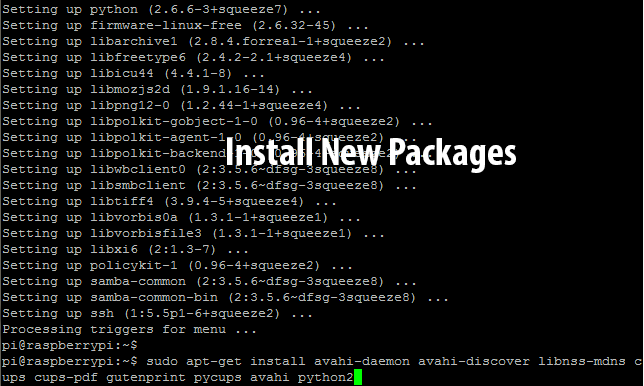
At this point, we have to begin to install all of the programs that the AirPrint functionality will rely on: namely CUPS to process print jobs and the Avahi Daemon to handle the AirPrint announcement. Run sudo apt-get install avahi-daemon avahi-discover libnss-mdns cups cups-pdf gutenprint pycups avahi python2 to begin this install.
Looks like some of those have been deprecated or had their names changed. We’ll have to install those ones again in a minute.
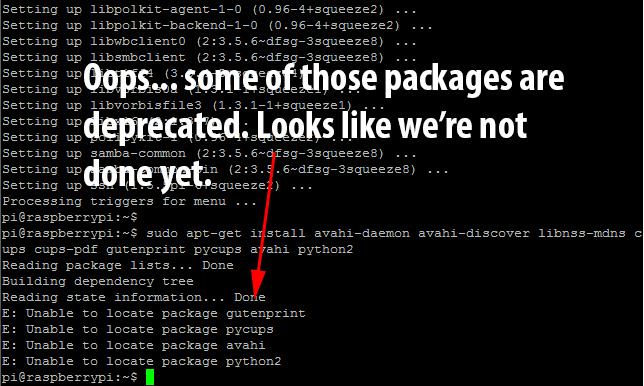
For some strange reason CUPS didn’t get installed, even though it was the list of programs to install in the last command. Run sudo apt-get install cups to fix this.
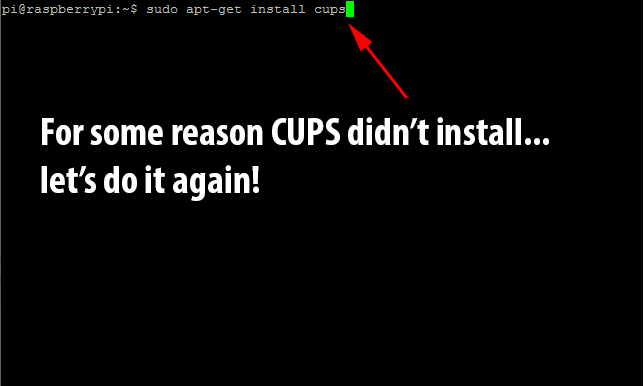
Once again, it will need confirmation before continuing. As before, just type in y and press enter to continue.
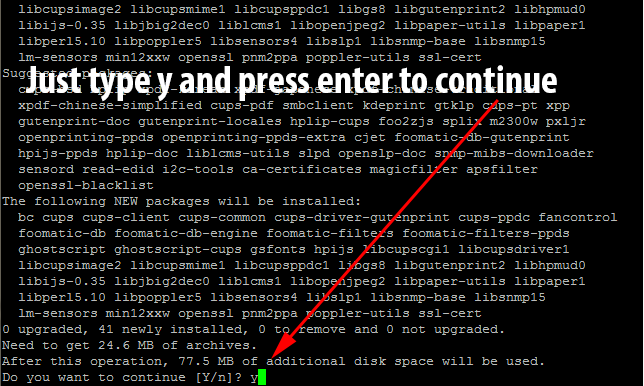
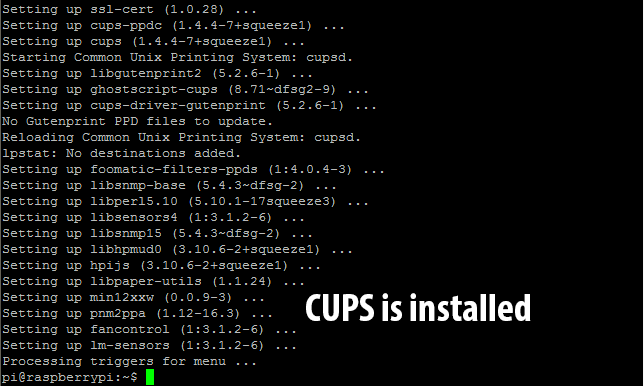
Once it finishes, you will again be returned to the bash prompt.
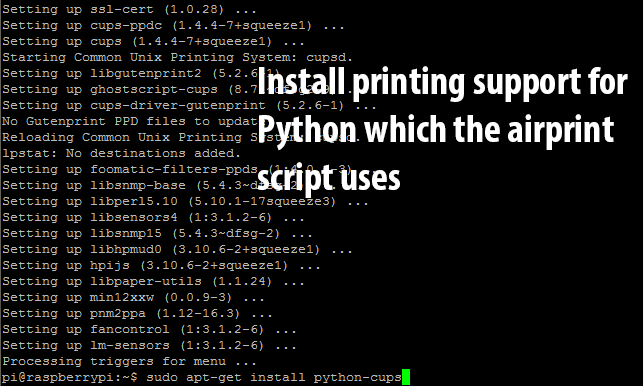
Time to install python-cups which allows python programs to print to the CUPS server. Run sudo apt-get install python-cups to install.
Once you’ve returned to the bash prompt, run sudo apt-get install avahi-daemon to install the avahi daemon (an mDNS server needed for AirPrint support).
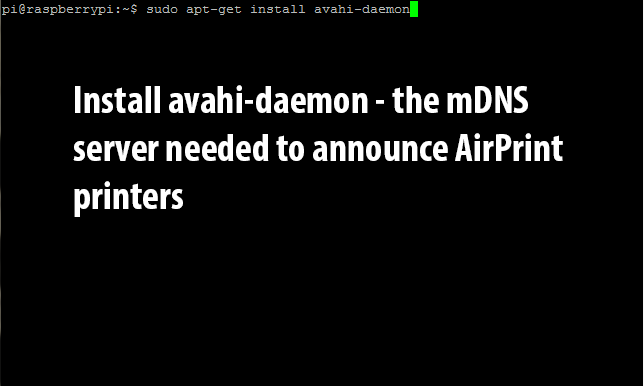
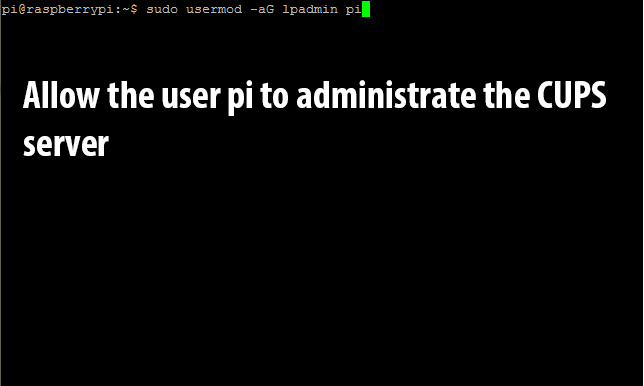
For security purposes, the CUPS server requires configuration changes (managing printers, etc) to come from an authorized user. By default, it only considers users authorized if they are members of the lpadmin group. To continue with the tutorial, we will have to add our user (in this case pi) to the lpadmin group. We do this with the following command: sudo usermod -aG lpadmin pi (replace pi with your username).
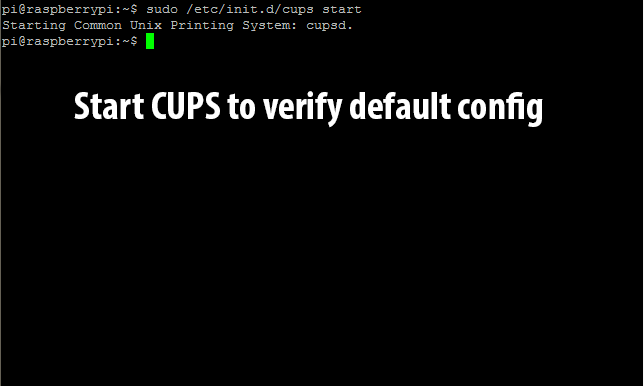
Before continuing, lets start the cups service and make sure the default configuration is working: sudo /etc/init.d/cups start.
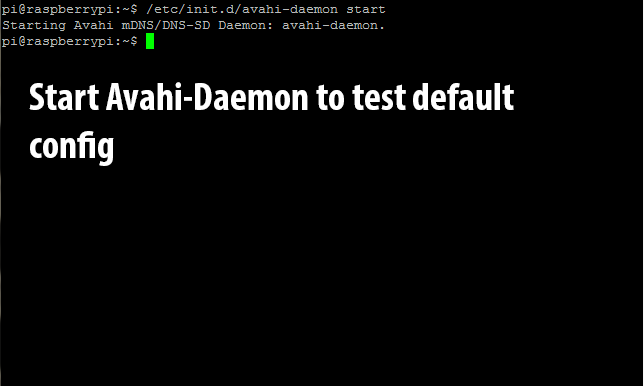
Since we just tested CUPS’s default configuration, we might as well do the same to the Avahi-Daemon: sudo /etc/init.d/avahi-daemon start.
If you get any errors during the previous two startup phases, it is likely that you didn’t install something properly. In that case, I recommend that you go through the steps from the beginning again and make sure that everything is okay! If you proceed through without any errors then it’s time to edit the CUPS config file to allow us to remotely administer it (and print to it without a user account on the local network – needed for AirPrint). Enter in sudo nano /etc/cups/cupsd.conf.
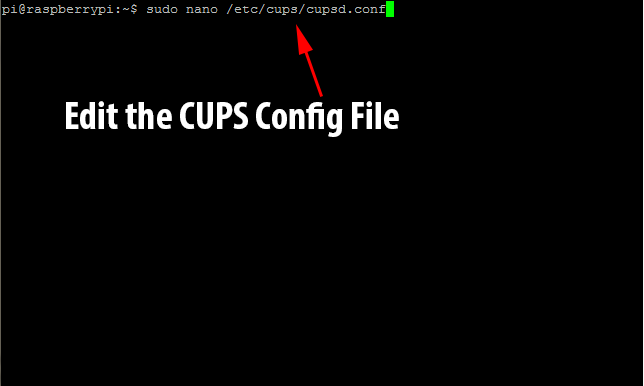
The configuration file will load in the nano editor. It will look like this.
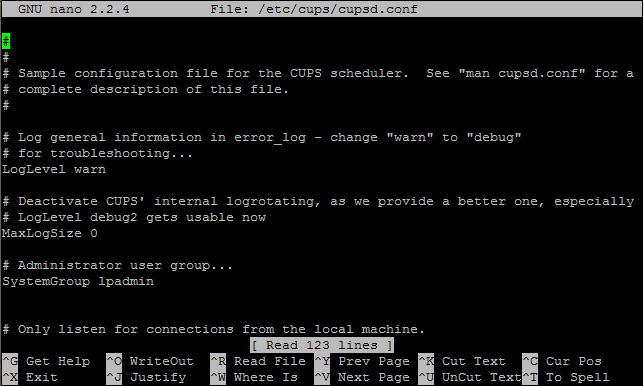
Use the down arrow until you come to the line that says Listen localhost:631.
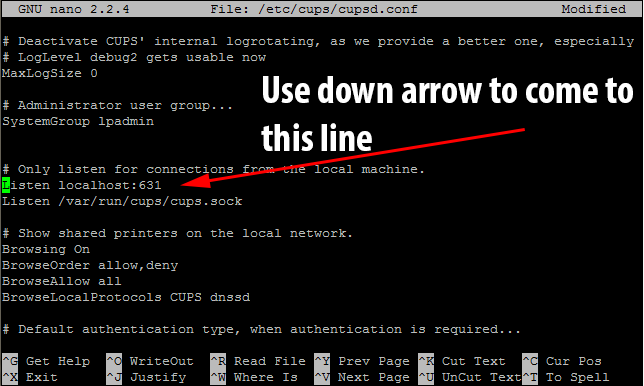
This tells CUPS to only listen to connections from the local machine. As we need to use it as a network print server, we need to comment that line out with a hashtag(#). As we want to listen to all connections on Port 631, we need to add the line Port 631 immediately after the line we commented out.
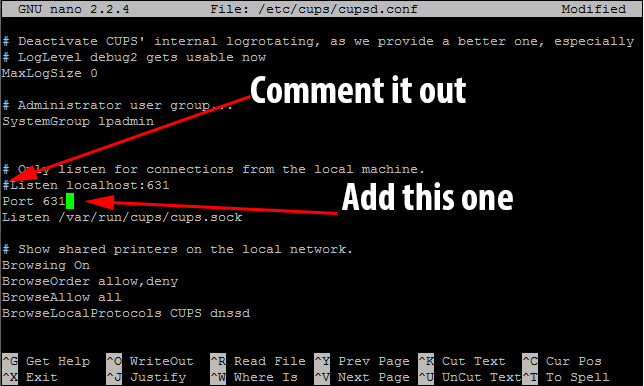
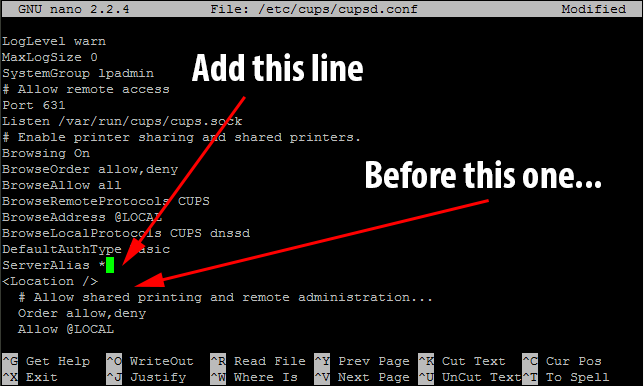
We also need to tell CUPS to alias itself to any hostname as AirPrint communicates with CUPS with a different hostname than the machine-defined one. To do this we need to add the directive ServerAlias * before the first <Location /> block.
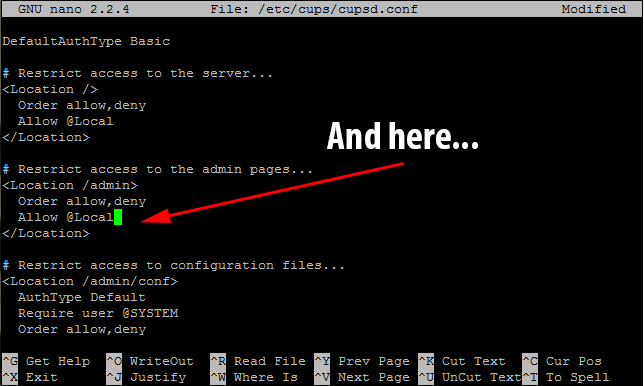
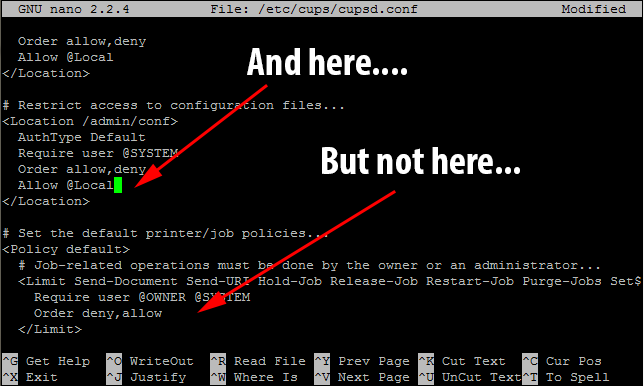
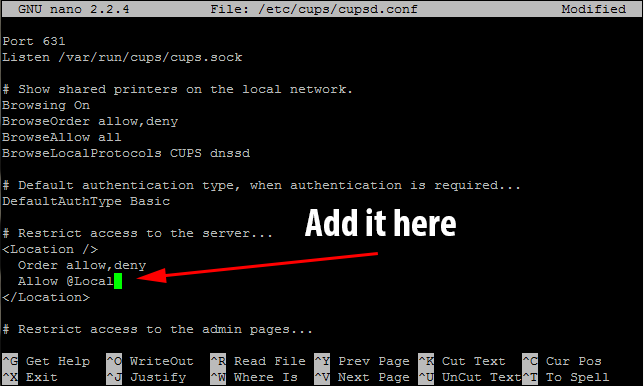
To continue setting up remote administration, there are several places that we need to enter the line Allow @Local after the line Order allow, deny – however this does not apply to all instances of that line.
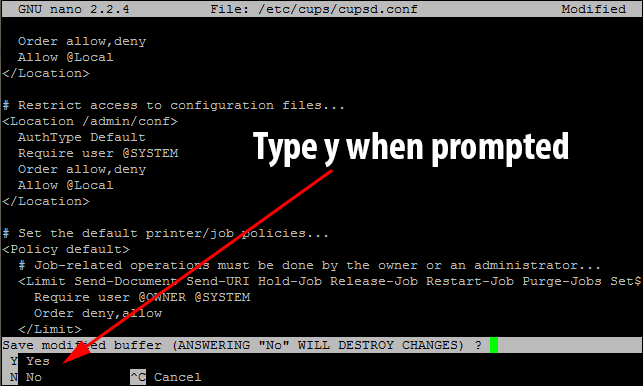
We now need to save the CUPS config file and exit the nano text editor. To do this hold down ctrl and press x. You will be prompted to save the changes. Make sure to type y when it prompts you.
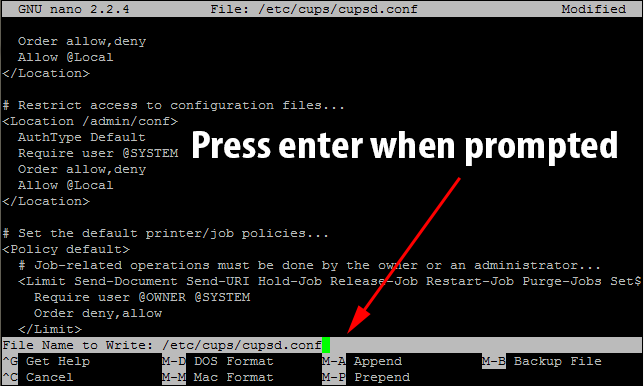
It will then ask you to confirm the file name to save to. Just press enter when it prompts you.
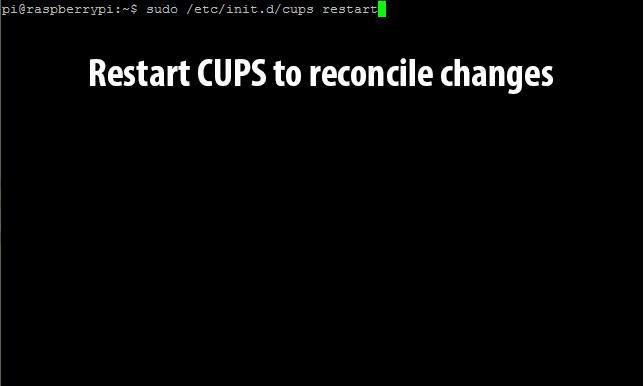
Next, we need to restart CUPS to have the currently running version use the new settings. Run sudo /etc/init.d/cups restart to restart the server.
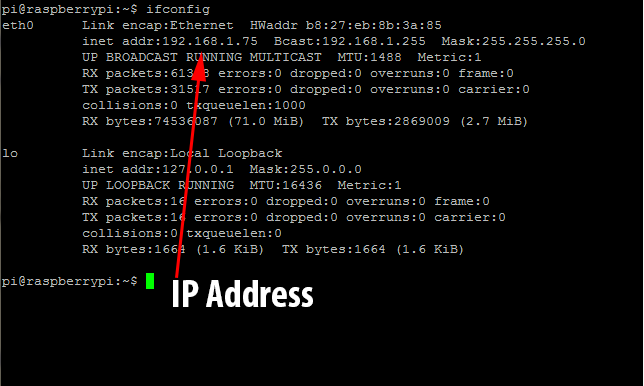
It’s time to find out the Pi’s IP address to continue setting up printing via the web configuration tool. In my case, my Pi is assigned a static address by my DHCP server of 192.168.1.75. To find out your Pi’s IP address, just run ifconfig.
Once we have the IP address, we can open a browser to the CUPS configuration page located at ip_address:631. More than likely you will see a security error as the Raspberry Pi is using a self-made SSL certificate (unless you have bought and installed one).
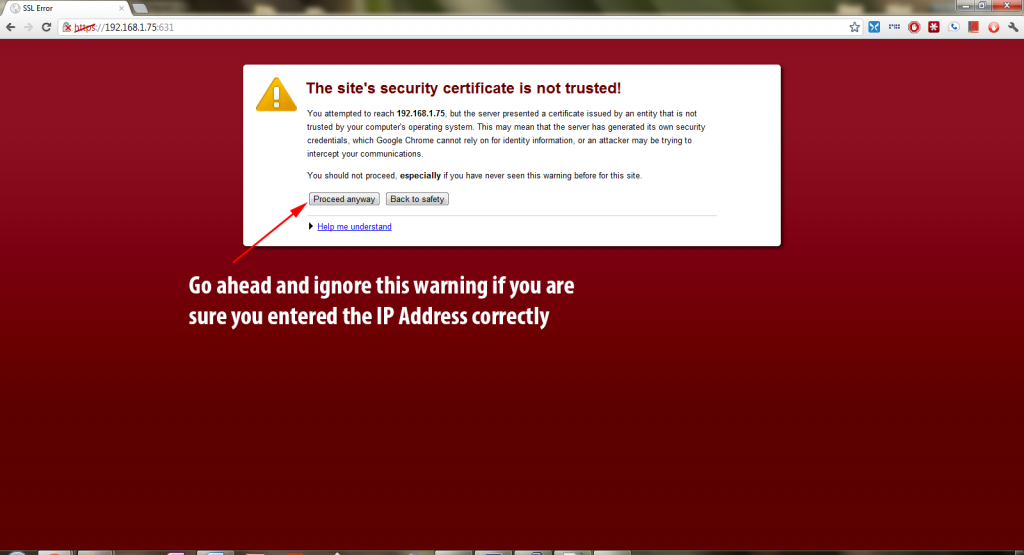
To continue on, click on Proceed anyway or your browser’s equivalent if you are sure you have entered in the correct IP address. You will then see this screen.
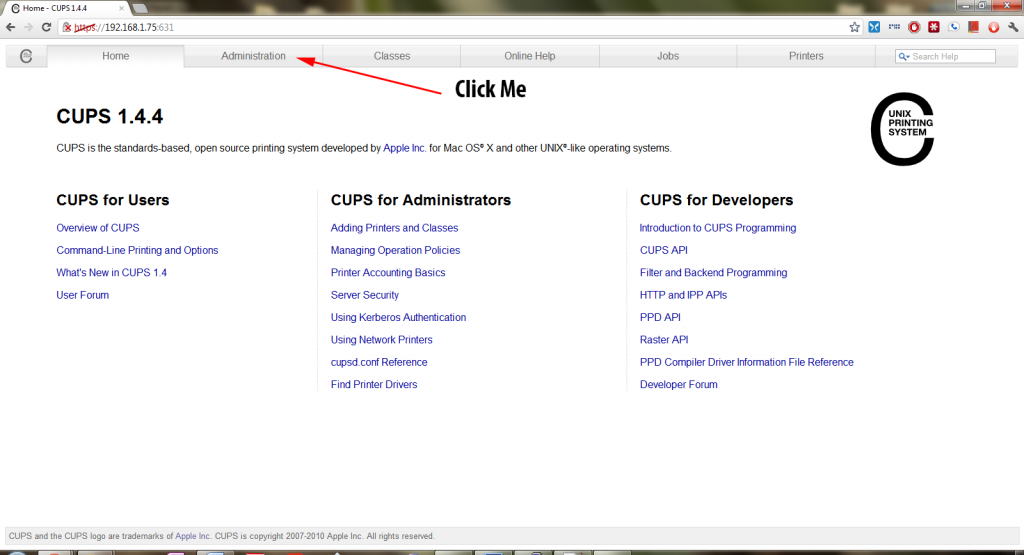
From there, go ahead and click the Administration tab at the top of the page. You will need to check the box that says Share Printers connected to this system and then click the Change Settings button.
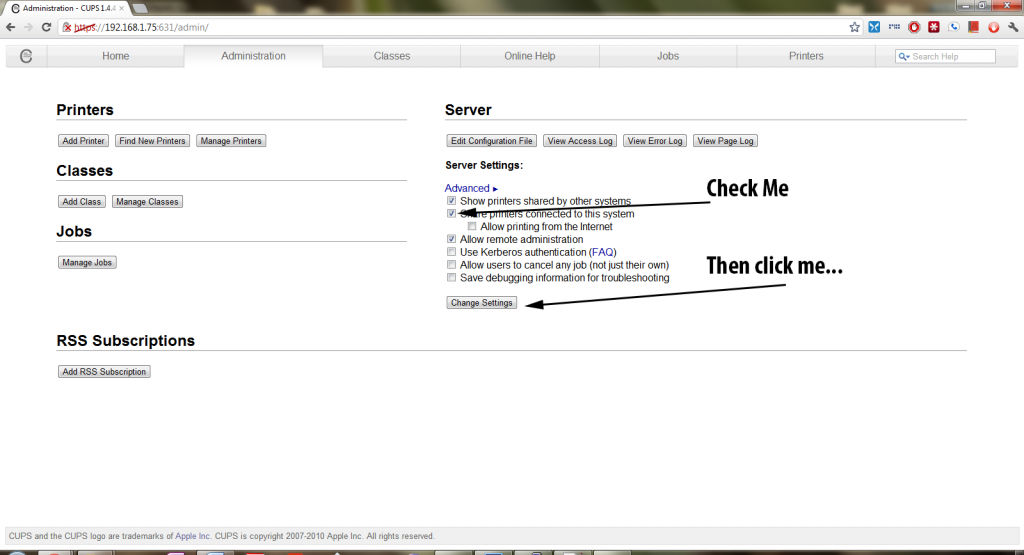
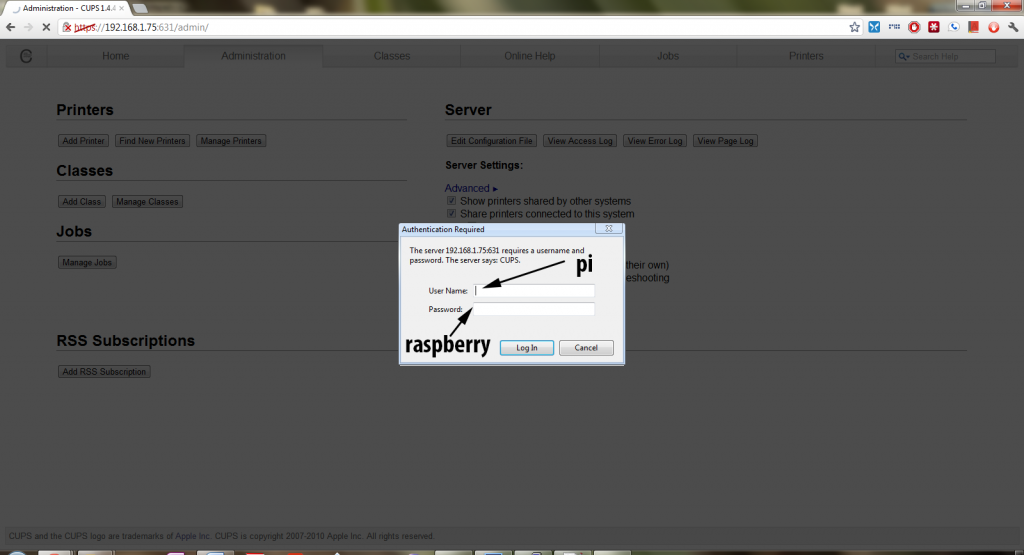
CUPS will request password authentication, and since we added the user pi to the lpadmin group earlier, we can login with the username pi and password raspberry.
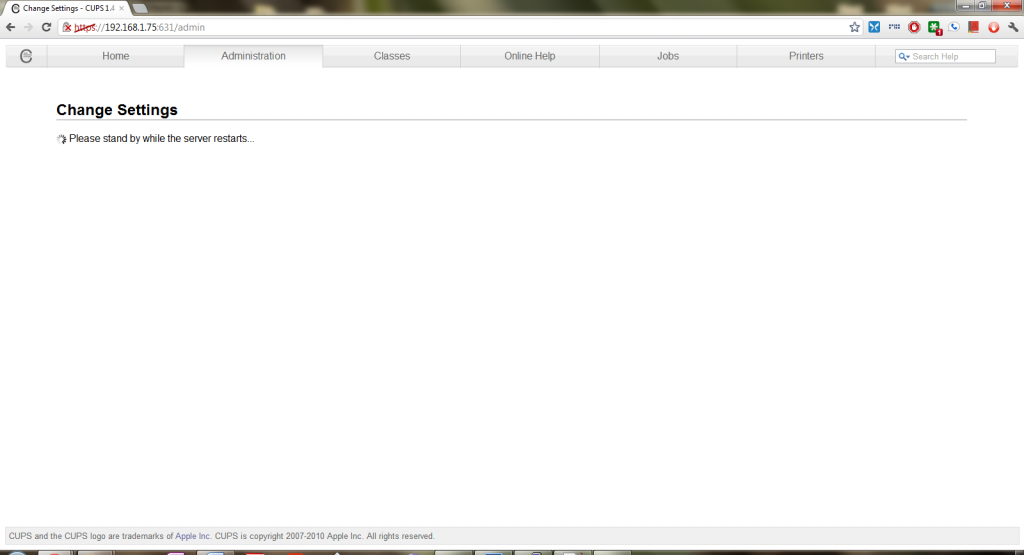
The CUPS server will write those changes to it’s configuration file and then reboot.
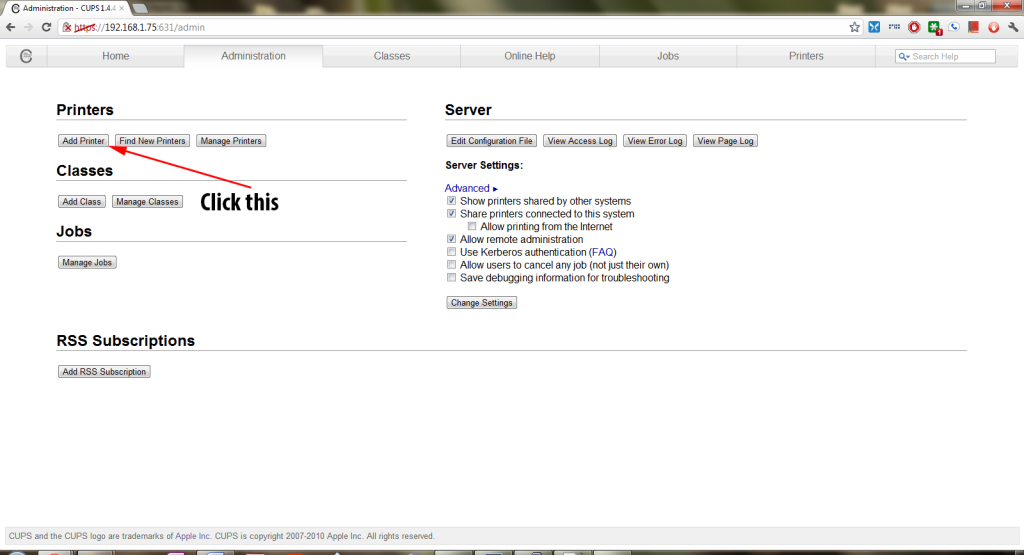
At this point, it is time to setup your printer with CUPS. In my case, I am using a Brother HL-2170w network laser printer and my screenshots will be tailored to that printer. Most other printers that are CUPS compatible (check http://www.openprinting.org/printers for compatibility) will operate the same way. If you are using a USB printer, now is the time to plug it in. Give it about a few seconds to get recognized by the Pi and then click the Add Printer button to begin!
CUPS will begin looking for printers. Just wait till it comes to a list of discovered printers.
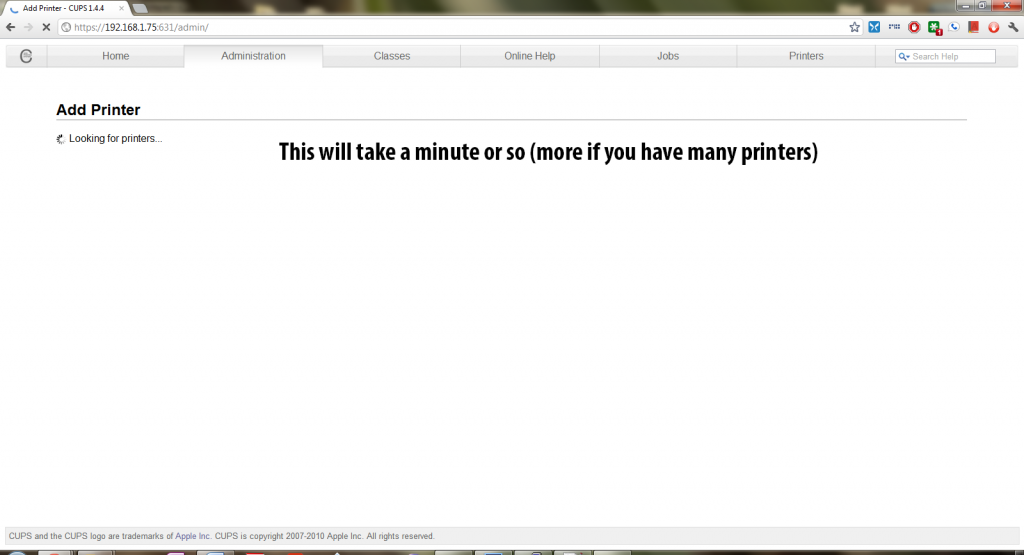
Eventually you will come to a page that looks like this:
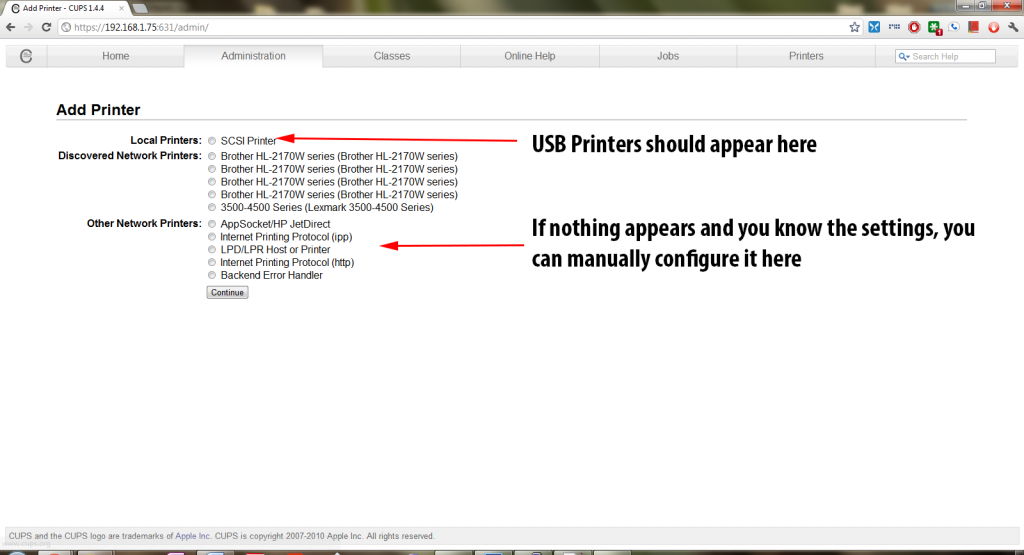
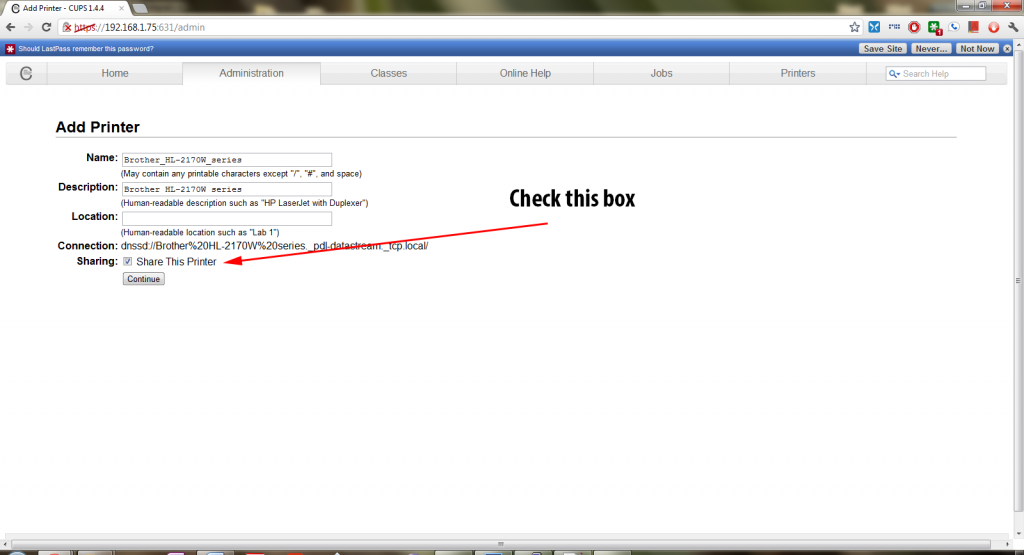
Once you have chosen the correct printer and clicked continue – you will be brought to the settings page. Make sure to check the box regarding sharing or AirPrint may not work correctly.
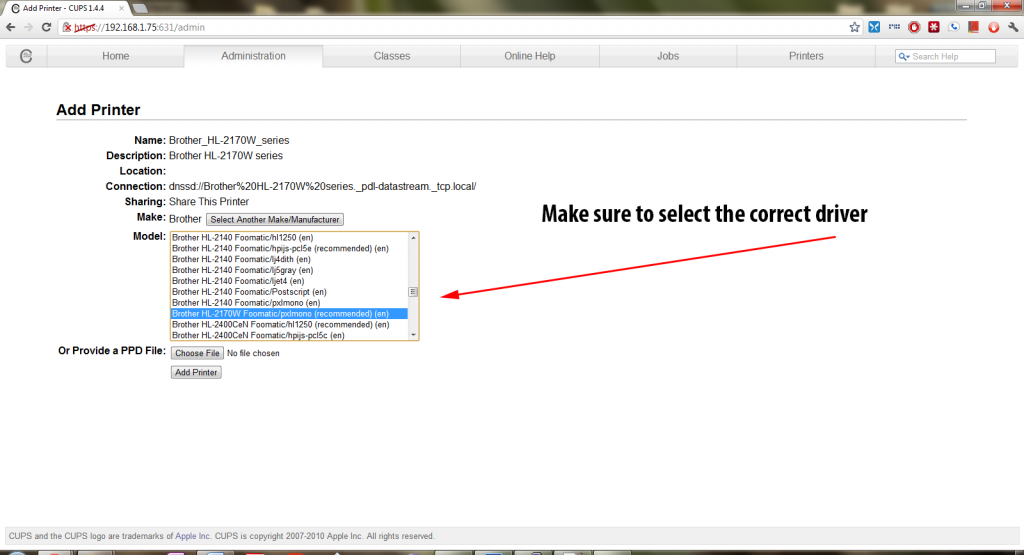
You will then have to select the driver for your printer. In most cases, CUPS will have the driver already and all you need to do is select it – but with newer printers, you will need to get a ppd file from the OpenPrinting database and use that.
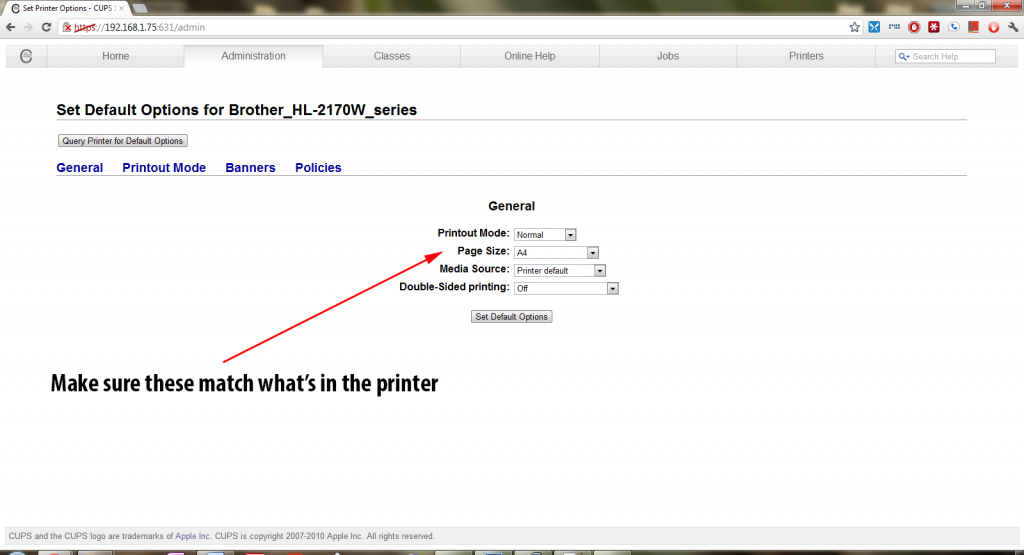
Then you need to set the default settings for the printer, including paper size and type. Make sure those match your printer so that everything prints out properly.
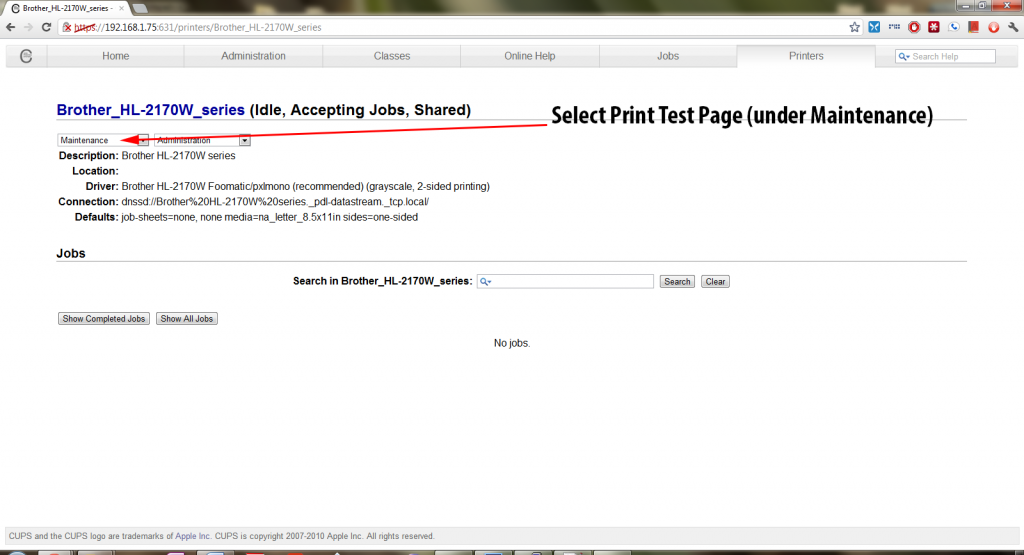
Once you are done, you should see the Printer Status page. In the Maintenance box, select Print Test Page and make sure that it prints out and looks okay.
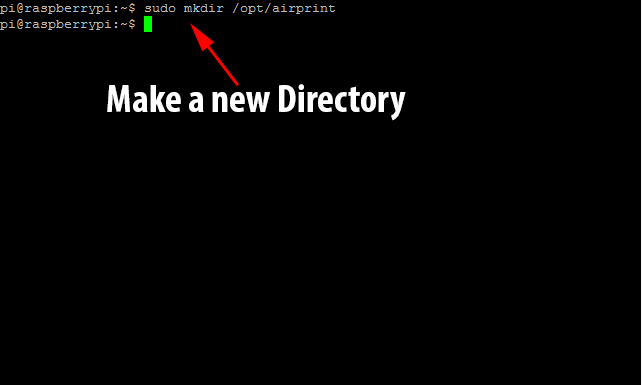
If you get a proper test page, then you’ve successfully setup your CUPS server to print to your printer(s). All that’s left is setting up the AirPrint announcement via the Avahi Daemon. Thankfully, we no longer have to do this manually, as TJFontaine has created a python script that automatically talks to CUPS and sets it up for us! It’s time to go back to the Raspberry Pi terminal and create a new directory. Run sudo mkdir /opt/airprint to create the directory airprint under /opt/.
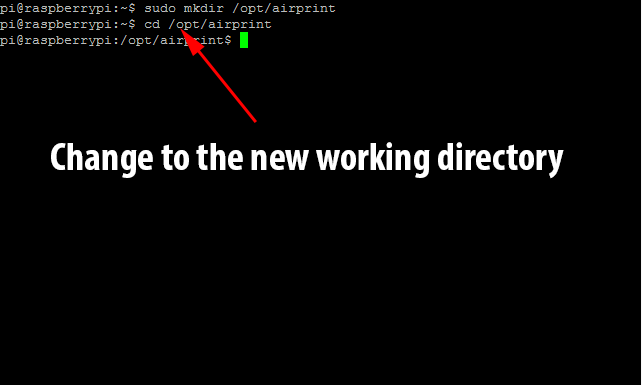
We next need to move to that directory with the command cd /opt/airprint.
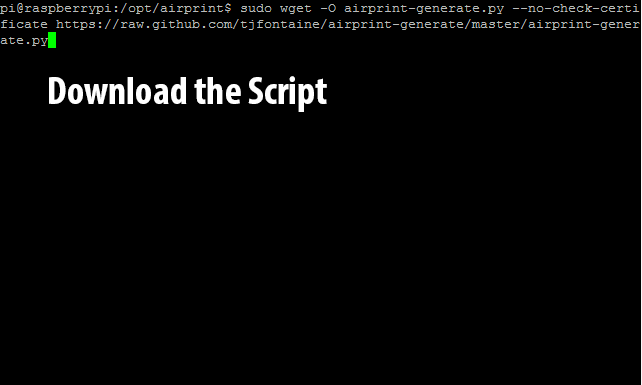
Now we need to download the script with the following command: sudo wget -O airprint-generate.py --no-check-certificate https://raw.github.com/tjfontaine/airprint-generate/master/airprint-generate.py
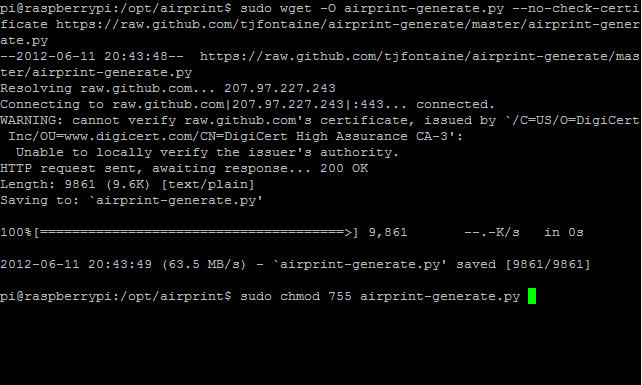
Next, we need to change the script’s permissions so that we can execute it with the command sudo chmod 755 airprint-generate.py.
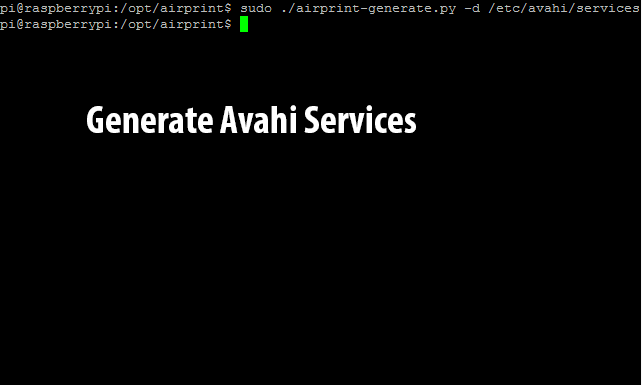
It’s time to finally run the script and generate the Avahi service file(s). Use the command: sudo ./airprint-generate.py -d /etc/avahi/services to directly place the generated files where Avahi wants them.
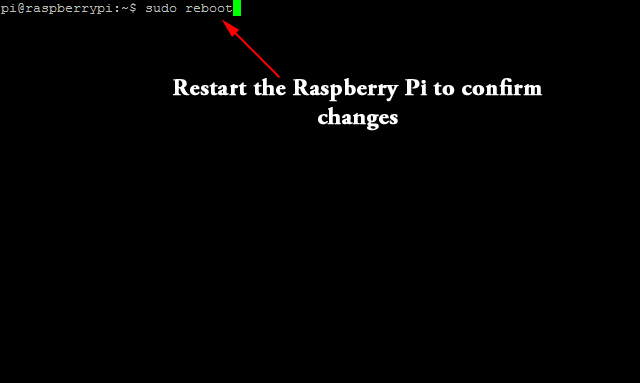
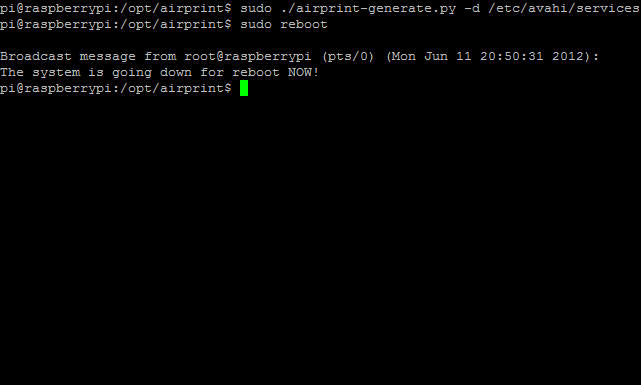
At this point everything should be working, but just to make sure, I like to do a full system reboot with the command sudo reboot. Once the system comes back up, your new AirPrint Server should be ready!
To print from iOS, simply go to any application that supports printing (like Mail or Safari) and click the print button.

Once you select your printer, and it queries it and will send the printjob! It may take a couple minutes to come out at the printer but hey, your iOS device is printing to your regular old printer through a Raspberry Pi! That’s pretty cool and functional right? And the absolute best part, since the Raspberry Pi uses such little power (I’ve heard it’s less than 10 watts), it is very cheap to keep running 24/7 to provide printing services!

UPDATE: If you are running iOS6, due to slight changes in the AirPrint definition, you will have to follow the instructions here, to make it work. Thanks to Marco for sharing them!

Clothing the Raspberry Pi (Or Getting the Raspberry Pi a Case)

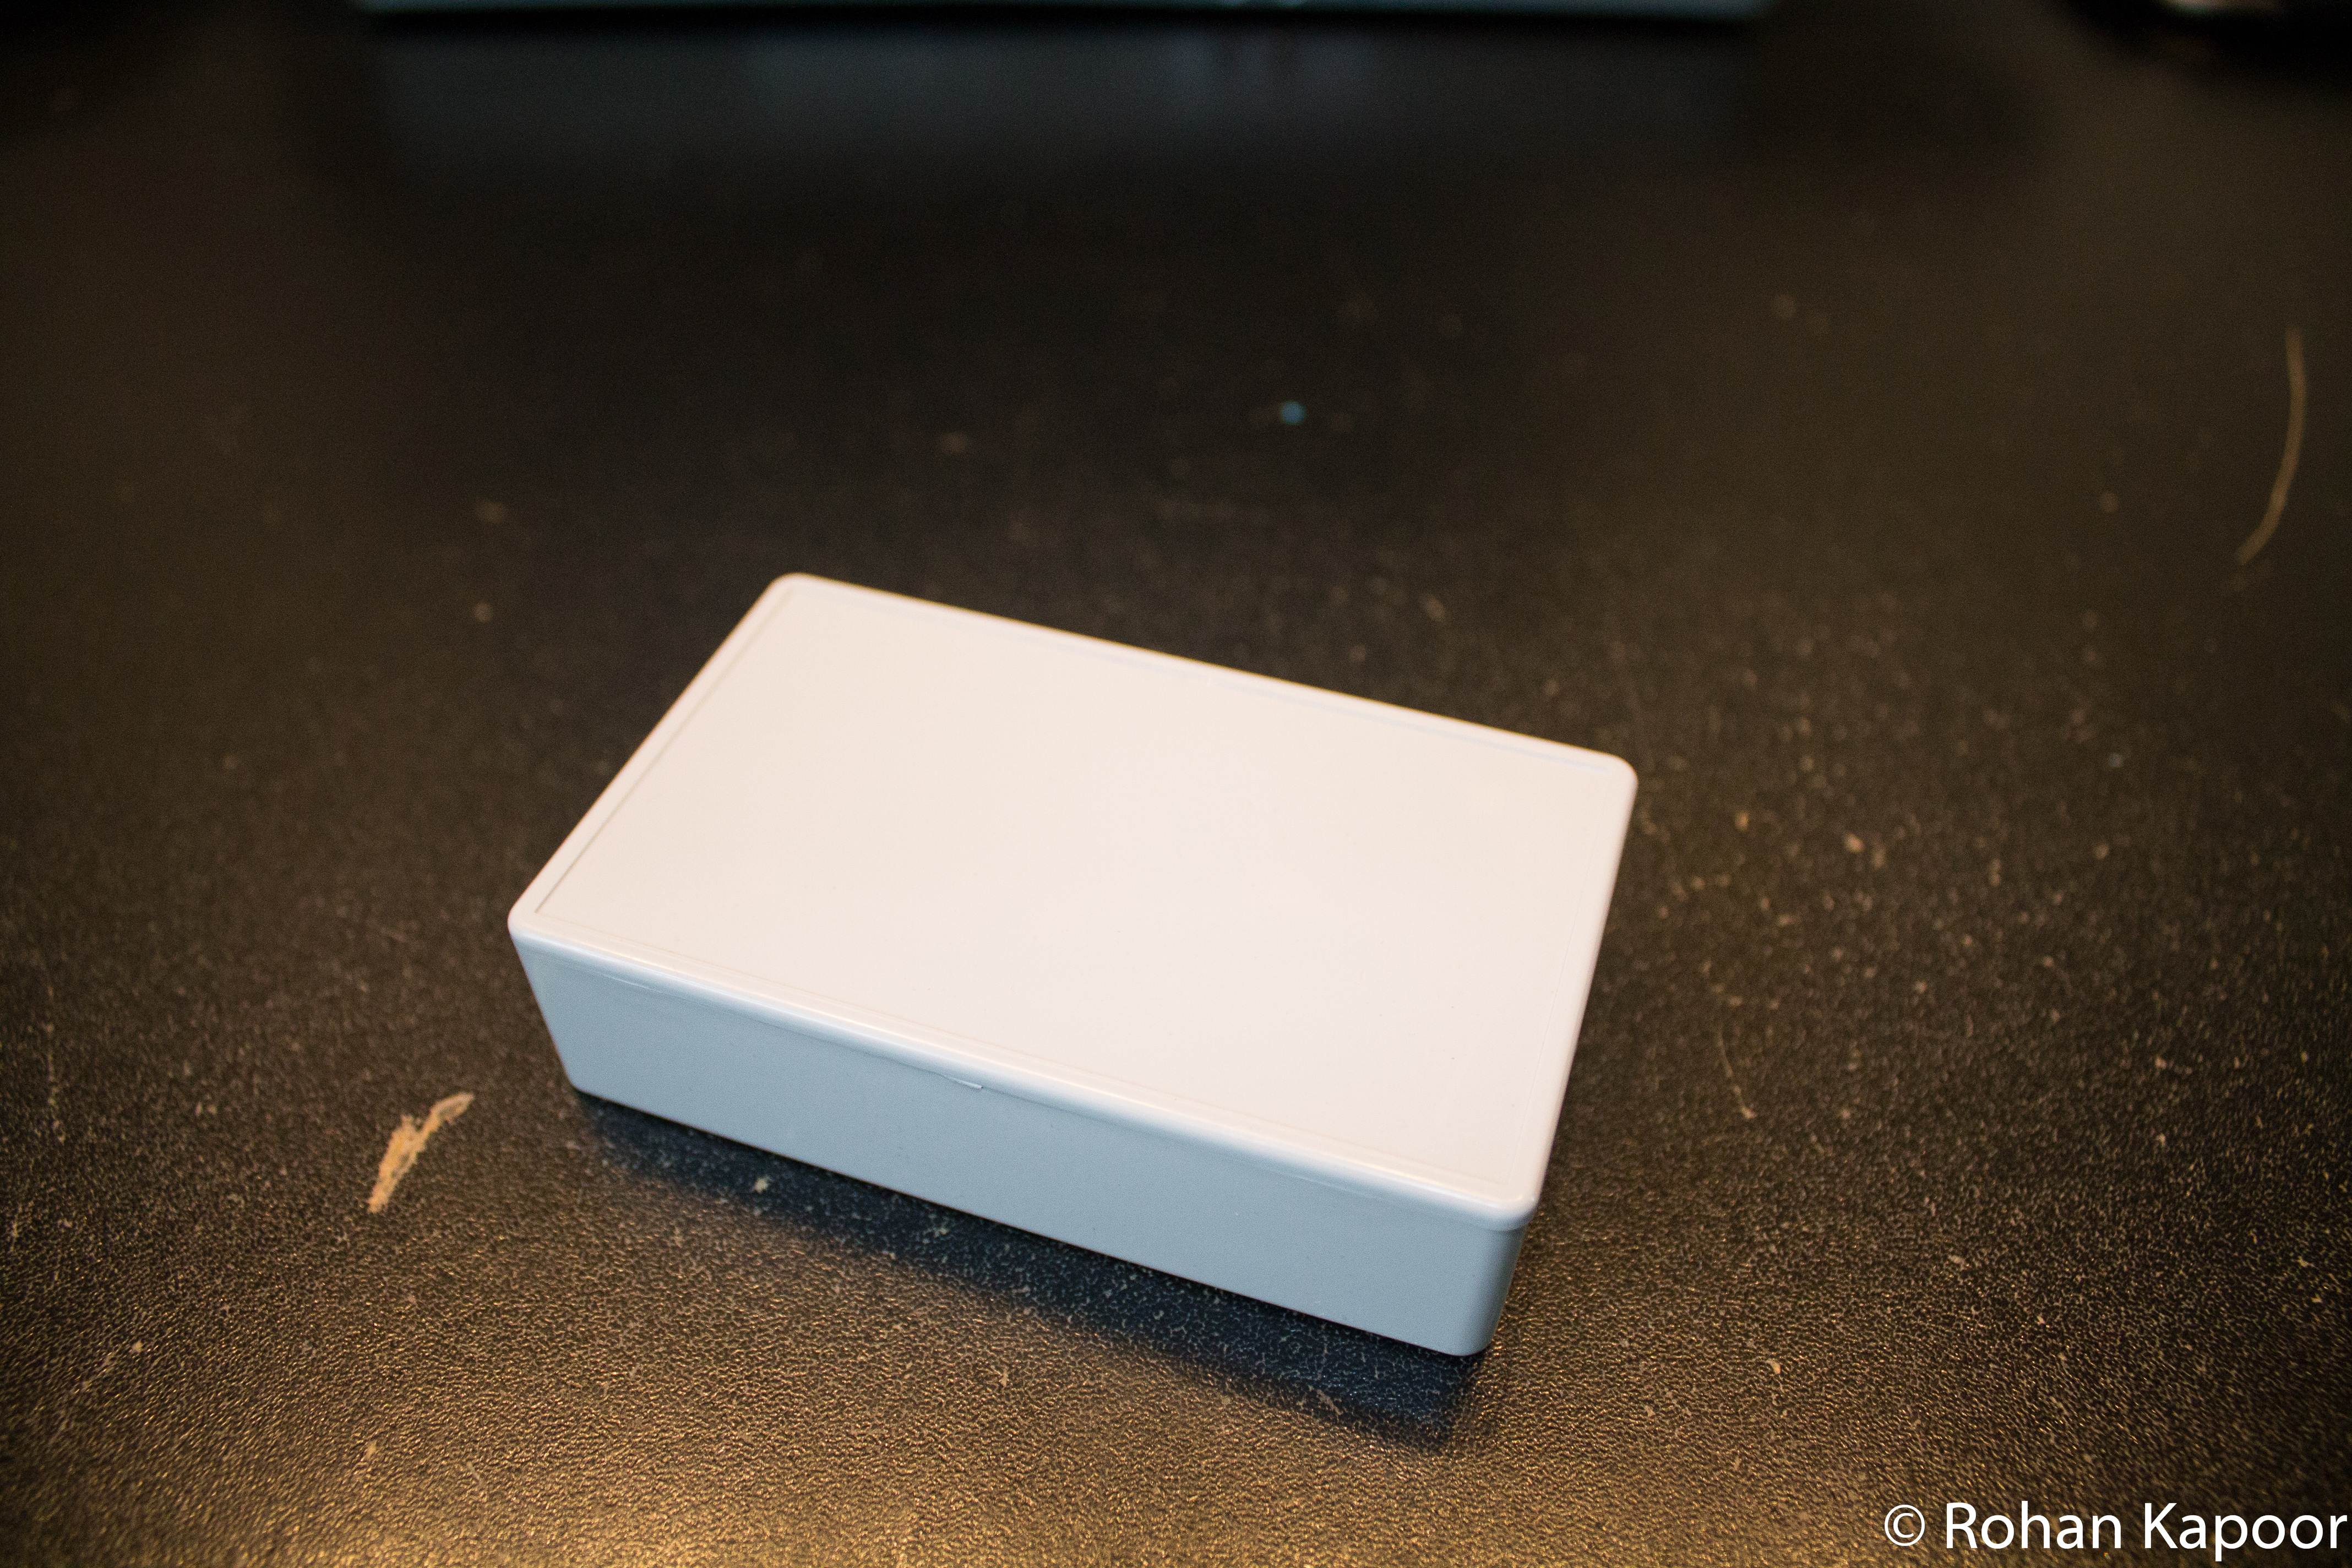
Before I even had a Raspberry Pi, I purchased this project box from eBay hoping that from the schematic measurements of the Raspberry Pi, it would fit. When I got my Raspberry Pi on April 19th, I was much more concerned with playing with it and my upcoming AP exams than casing it. This past weekend, I pulled out the project box and began to fit the Raspberry Pi inside it.

I used an X-Acto knife to cut out the pieces of plastic from the box. The USB ports, RCA jack, and headphone jack all stick out past the sides of the box – to make them fit, I had to trim down extra material from the top of the box to allow them to slip in. The rest of the ports are flush except for the power jack and sd card slot, both of which are less than 1 inch shy of the box’s edge. For those ports that didn’t need to be cut top-down, I used the Punnet template to get the sizes of the ports down correctly. I taped it onto the project box sides and then used a drill to take out most of the holes. I then used the X-Acto knife to straighten them out.

To provide a bed for the Pi to sit on, I cut out strips from the pink piece of foam that the Pi shipped on and hotglued a small piece in each corner the Pi would touch.

Overall, I am very pleased with how my case for the Raspberry Pi came out, even though it’s not perfect by any means. I just wish their store was available again so that I could buy a couple of Raspberry Pi logo stickers for the plain box.

So far, I’ve tested it with the box closed for 3 days running as an AirPrint server (see the demo) and have not had any overheating issues. To the touch, the lid of the box is a little warm but nothing significant. I’ve included a small photo gallery for anyone interested.

Project Box (Closed)

Image 1 of 11

Demonstration: Raspberry Pi Running as an AirPrint Server

A few weeks ago, I wrote about setting up the Raspberry Pi to function as an AirPrint Server. This has the effect of allowing Apple’s ios devices to print to regular unix printers (that are accessible to CUPS) using the avahi-daemon for announcements. I’ve gotten all of this to work reliably on the Raspberry Pi and have been testing it out for the last several weeks. I know I promised a tutorial, but it has been rather slow going. The tutorial is coming soon – but today, I have a small video demonstration which shows how well this works.

The one thing I have noticed is that printing via AirPrint is a little slower than printing natively to the printer. My reasoning for that is twofold: One the limited processing power on the Raspberry Pi may be affecting the PDF rasterization time. And two, my Raspberry Pi is connected to a wireless ethernet bridge (802.11g) while the iPad is connected to the wireless access point (802.11n) so there is likely some lag caused by wireless network signals. All things considered, I am currently able to print from the iPad to my network printer (which itself is not AirPrint compatible) having spent on $35. This is the power of the Raspberry Pi!

Stay tuned for the tutorial – it’s on it’s way.


Raspberry Pi Working as AirPrint Server

As I just posted on Twitter, I have successfully gotten my Raspberry Pi to function as an AirPrint Server for ios devices. This allows any of the ios devices connected to my WiFi network to print to my network printers which do not support native AirPrint functionality. It was a bit convoluted to set up and did require a heavy usage of the terminal but in the end it was totally worth it! It took me about 35 minutes to setup (including the 2 minutes I spent wondering why the iPhone couldn’t find the printer before I realized the WiFi was off)!

A tutorial (with step by step instructions) and a video demonstration will be coming out on Saturday, so stay tuned!

“Americanizing” the Raspberry Pi

The Raspberry Pi is made by the Raspberry Pi Foundation, a UK charity organization. For this reason the Debian SD card image (and presumably the others) default to the English – UK locale, timezone, and keyboard layout. For those of us in America, this is clearly not going to work! Clayton Smith excellently documents the procedure for Canadian’s in this post on his blog. I followed his procedure, replacing en_CA with en_US. To make it a little easier to follow, I have turned this into a photo-tutorial using PuTTY to remotely SSH into the device from my Windows 7 running Desktop PC.

First up is logging in, which uses the username pi and password raspberry.

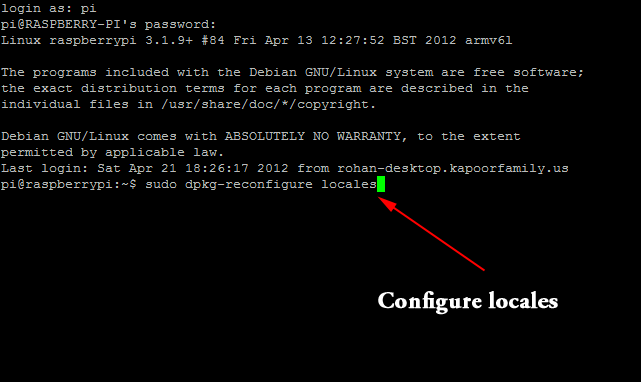
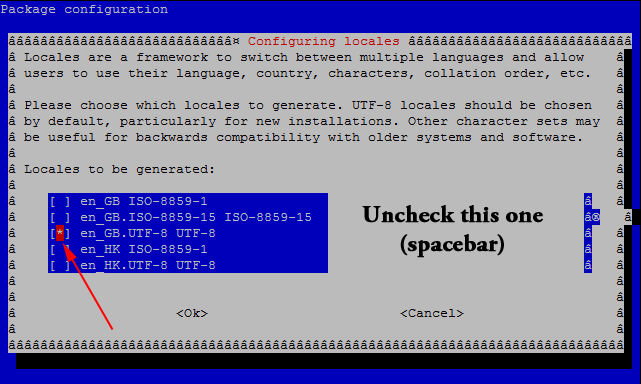
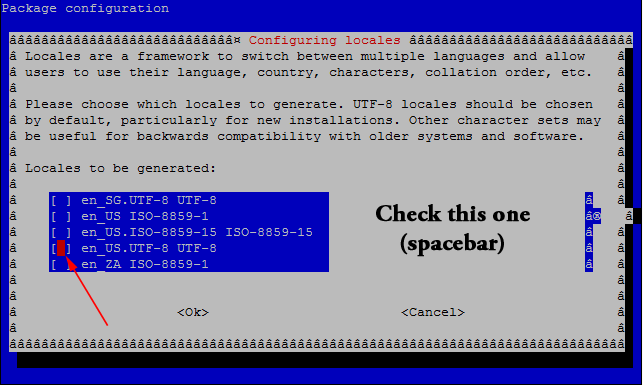
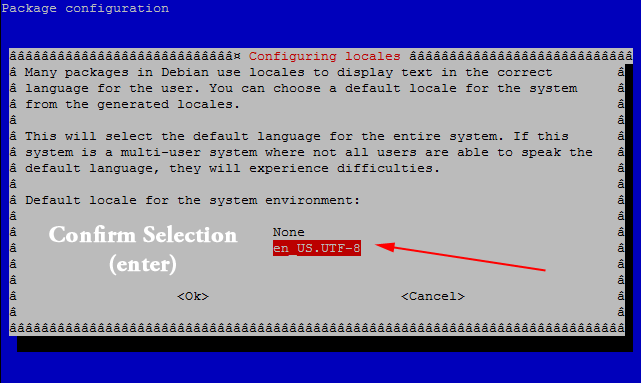
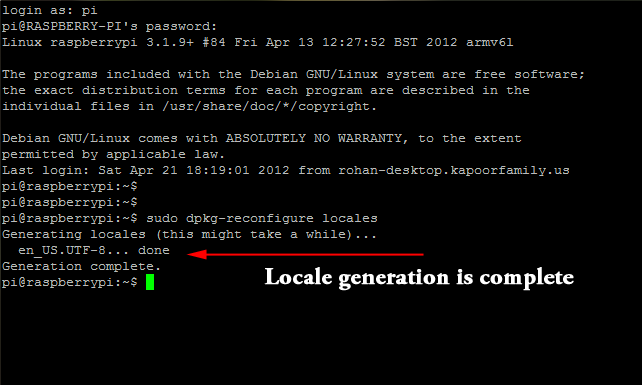
Next, change the system locale from en_GB.UTF-8; to en_US.UTF-8 by running the command sudo dpkg-reconfigure locales.

Use the arrow keys to move up/down and highlight options. Use the spacebar to select/deselect the options.

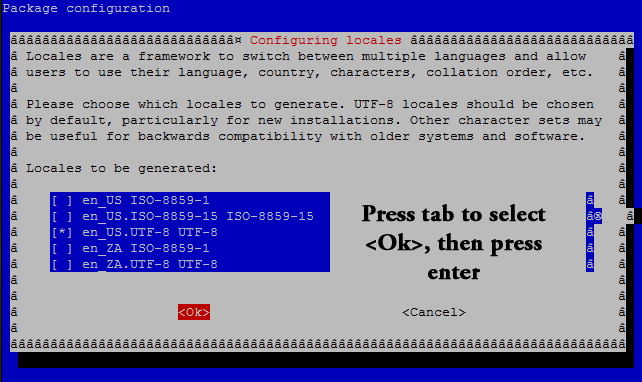
Press tab to select <Ok> and then press enter.

Confirm your selection.

The Raspberry Pi will now generate the selected locales.

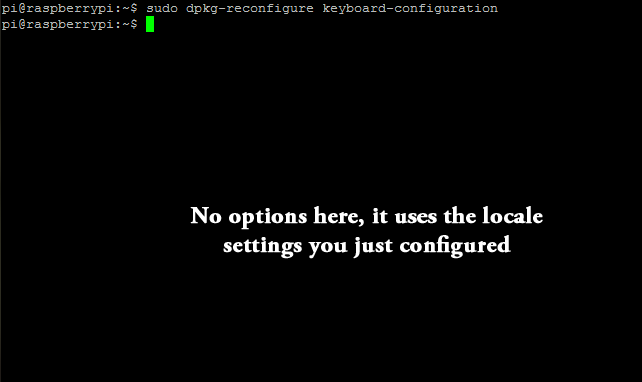
Now, it’s time to set the keyboard layout. Run the command sudo dpkg-reconfigure keyboard-configuration.

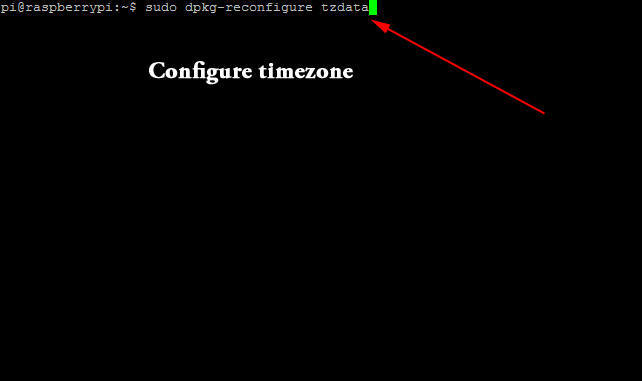
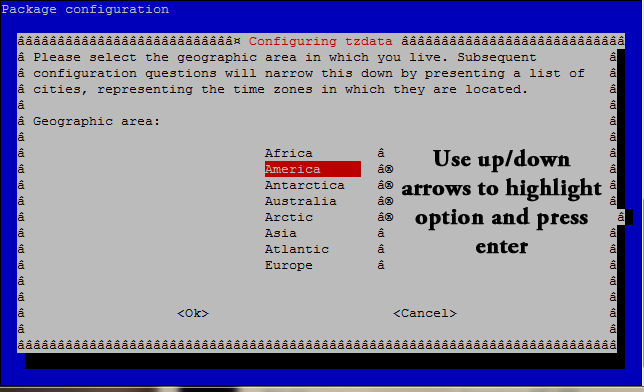
Next, we need to set the timezone. Run the command sudo dpkg-reconfigure tzdata.

Use the up/down arrows to select the appropriate location and press enter.

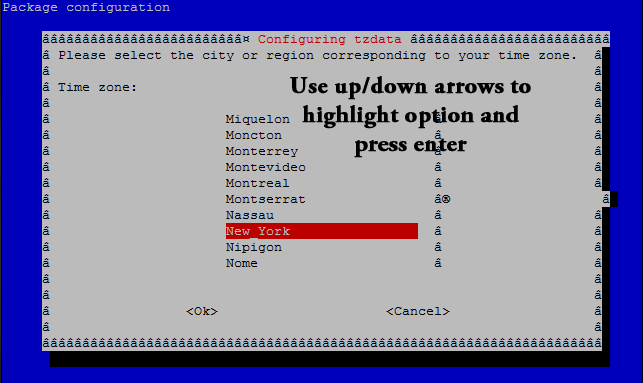
Use the up/down arrows (again) to select the appropriate timezone (closest city in your timezone) and press enter.

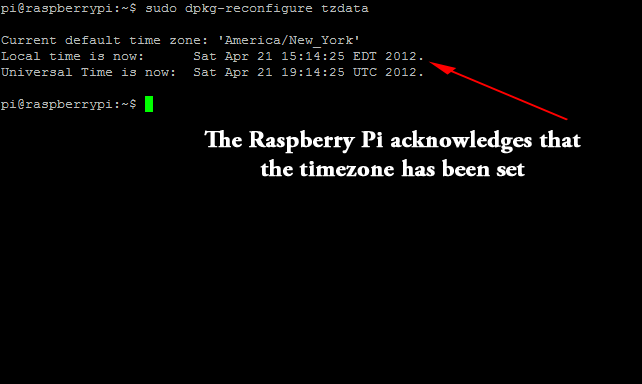
The Raspberry Pi will acknowledge the timezone change.

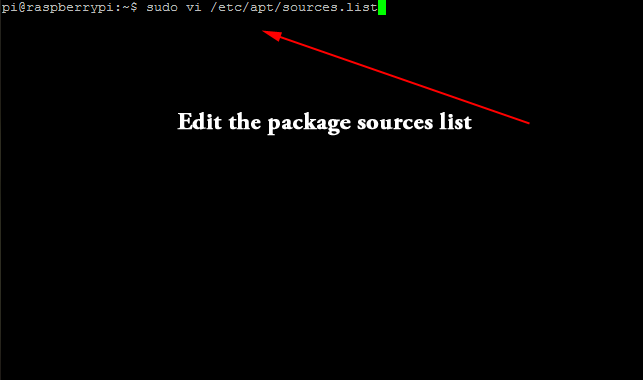
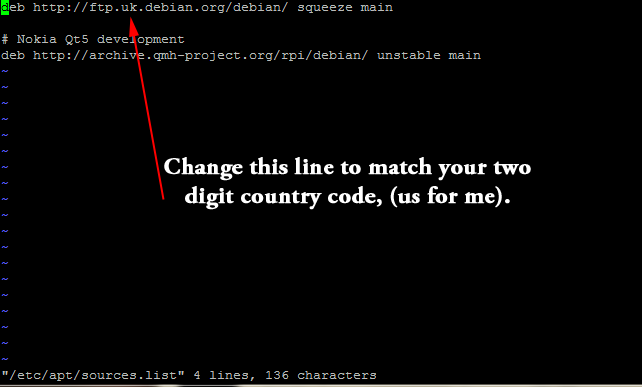
Next up is to modify the Debian packages source to use the US mirror (rather than the British one). Run the command sudo vi /etc/apt/sources.list.

Change the uk to match your two digit country code (us for me).

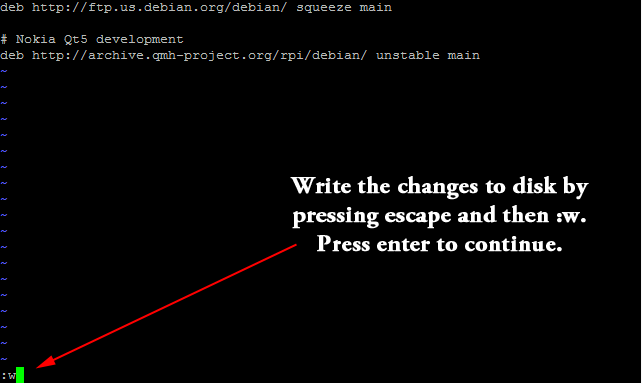
Write the changes to disk by pressing escape and then entering :w and pressing enter.

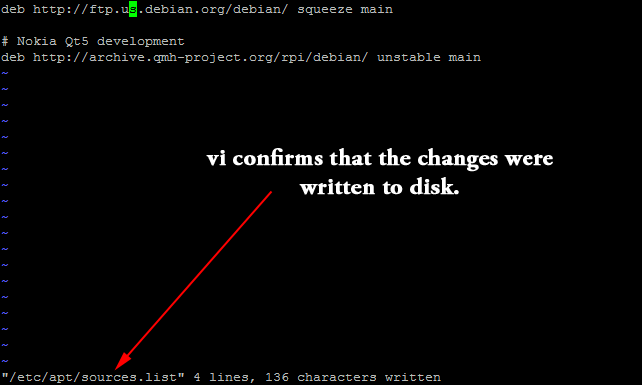
vi (the text editor) will confirm that the changes were written to the disk.

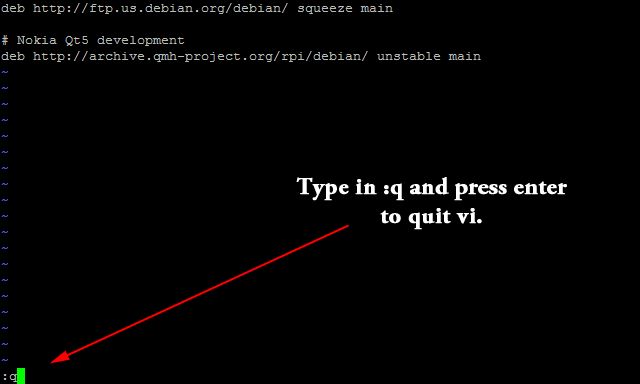
Quit vi (the text editor) by entering :q and pressing enter.

Then, run sudo apt-get update to update the package lists with the new source.

Finally, run sudo reboot to reboot the Raspberry Pi and confirm your changes.

Congratulations, your Raspberry Pi has been “Americanized!”

Raspberry Pi – It’s Finally Here!

I first heard about the Raspberry Pi last September and was immediately excited thinking about the endless possibilities of such a device. It truly could serve as the center of many things including a small linux server, a security camera to IP Camera converter, a small television mounted media center, and even the brains behind a small robot. At a price of $25 for the Model A version and $35 for the Model B version, it certainly is much more affordable than other such boards with this level of hardware. Both variants have a Broadcom BCM2835 – Arm11 CPU running at 700 Mhz with 256 MB of RAM and a Videocore 4 GPU. The only differences between them is the inbuilt USB hub and Ethernet ports providing two USB ports and 1 Ethernet jack directly on the board (Model B). This makes the Raspberry Pi a tremendous deal at $35 (for Model B).

After several manufacturing delays, the Raspberry Pi finally went on sale on February 29th with 10,000 available to buy. At this time, it was announced that the Raspberry Pi Foundation would not be the ones selling the Raspberry Pi (as was previously announced). To ramp up production quickly, Premiere Farnell and RS Electronics would be producing, selling and distributing Raspberry Pi’s. The first 10,000 were ordered by the Foundation and would be distributed to Element14 (Premiere Farnell) and RS Electronics when they arrived. I placed my order at Newark within minutes of the announcement, as the web-servers running the respective websites of Element14 and RS Electronics crashed. I was hopeful that I might have gotten one of the first 10,000 but cautiously so. At the end of the day, it was estimated that more than 100,000 Raspberry Pi’s were preordered.

It is now clear that there are in fact more than 350,000 preorders placed for the Raspberry Pi at this time. On Monday, I received an email from Newark stating that my Raspberry Pi had been shipped and I was ecstatic to hear that I had in fact, managed to get one of the first 10,000. After obsessively checking UPS for several days, my Raspberry Pi arrived on Thursday to my utmost delight!

After unpacking the Raspberry Pi, I burned the Debian release to my 8GB SD card and connected it all up and was greeted with… nothing. I had forgotten to actually put in the SD card (oops)! After putting in the SD card, the Raspberry Pi booted up with a proper terminal.

Next step: “Americanizing” the Raspberry Pi.

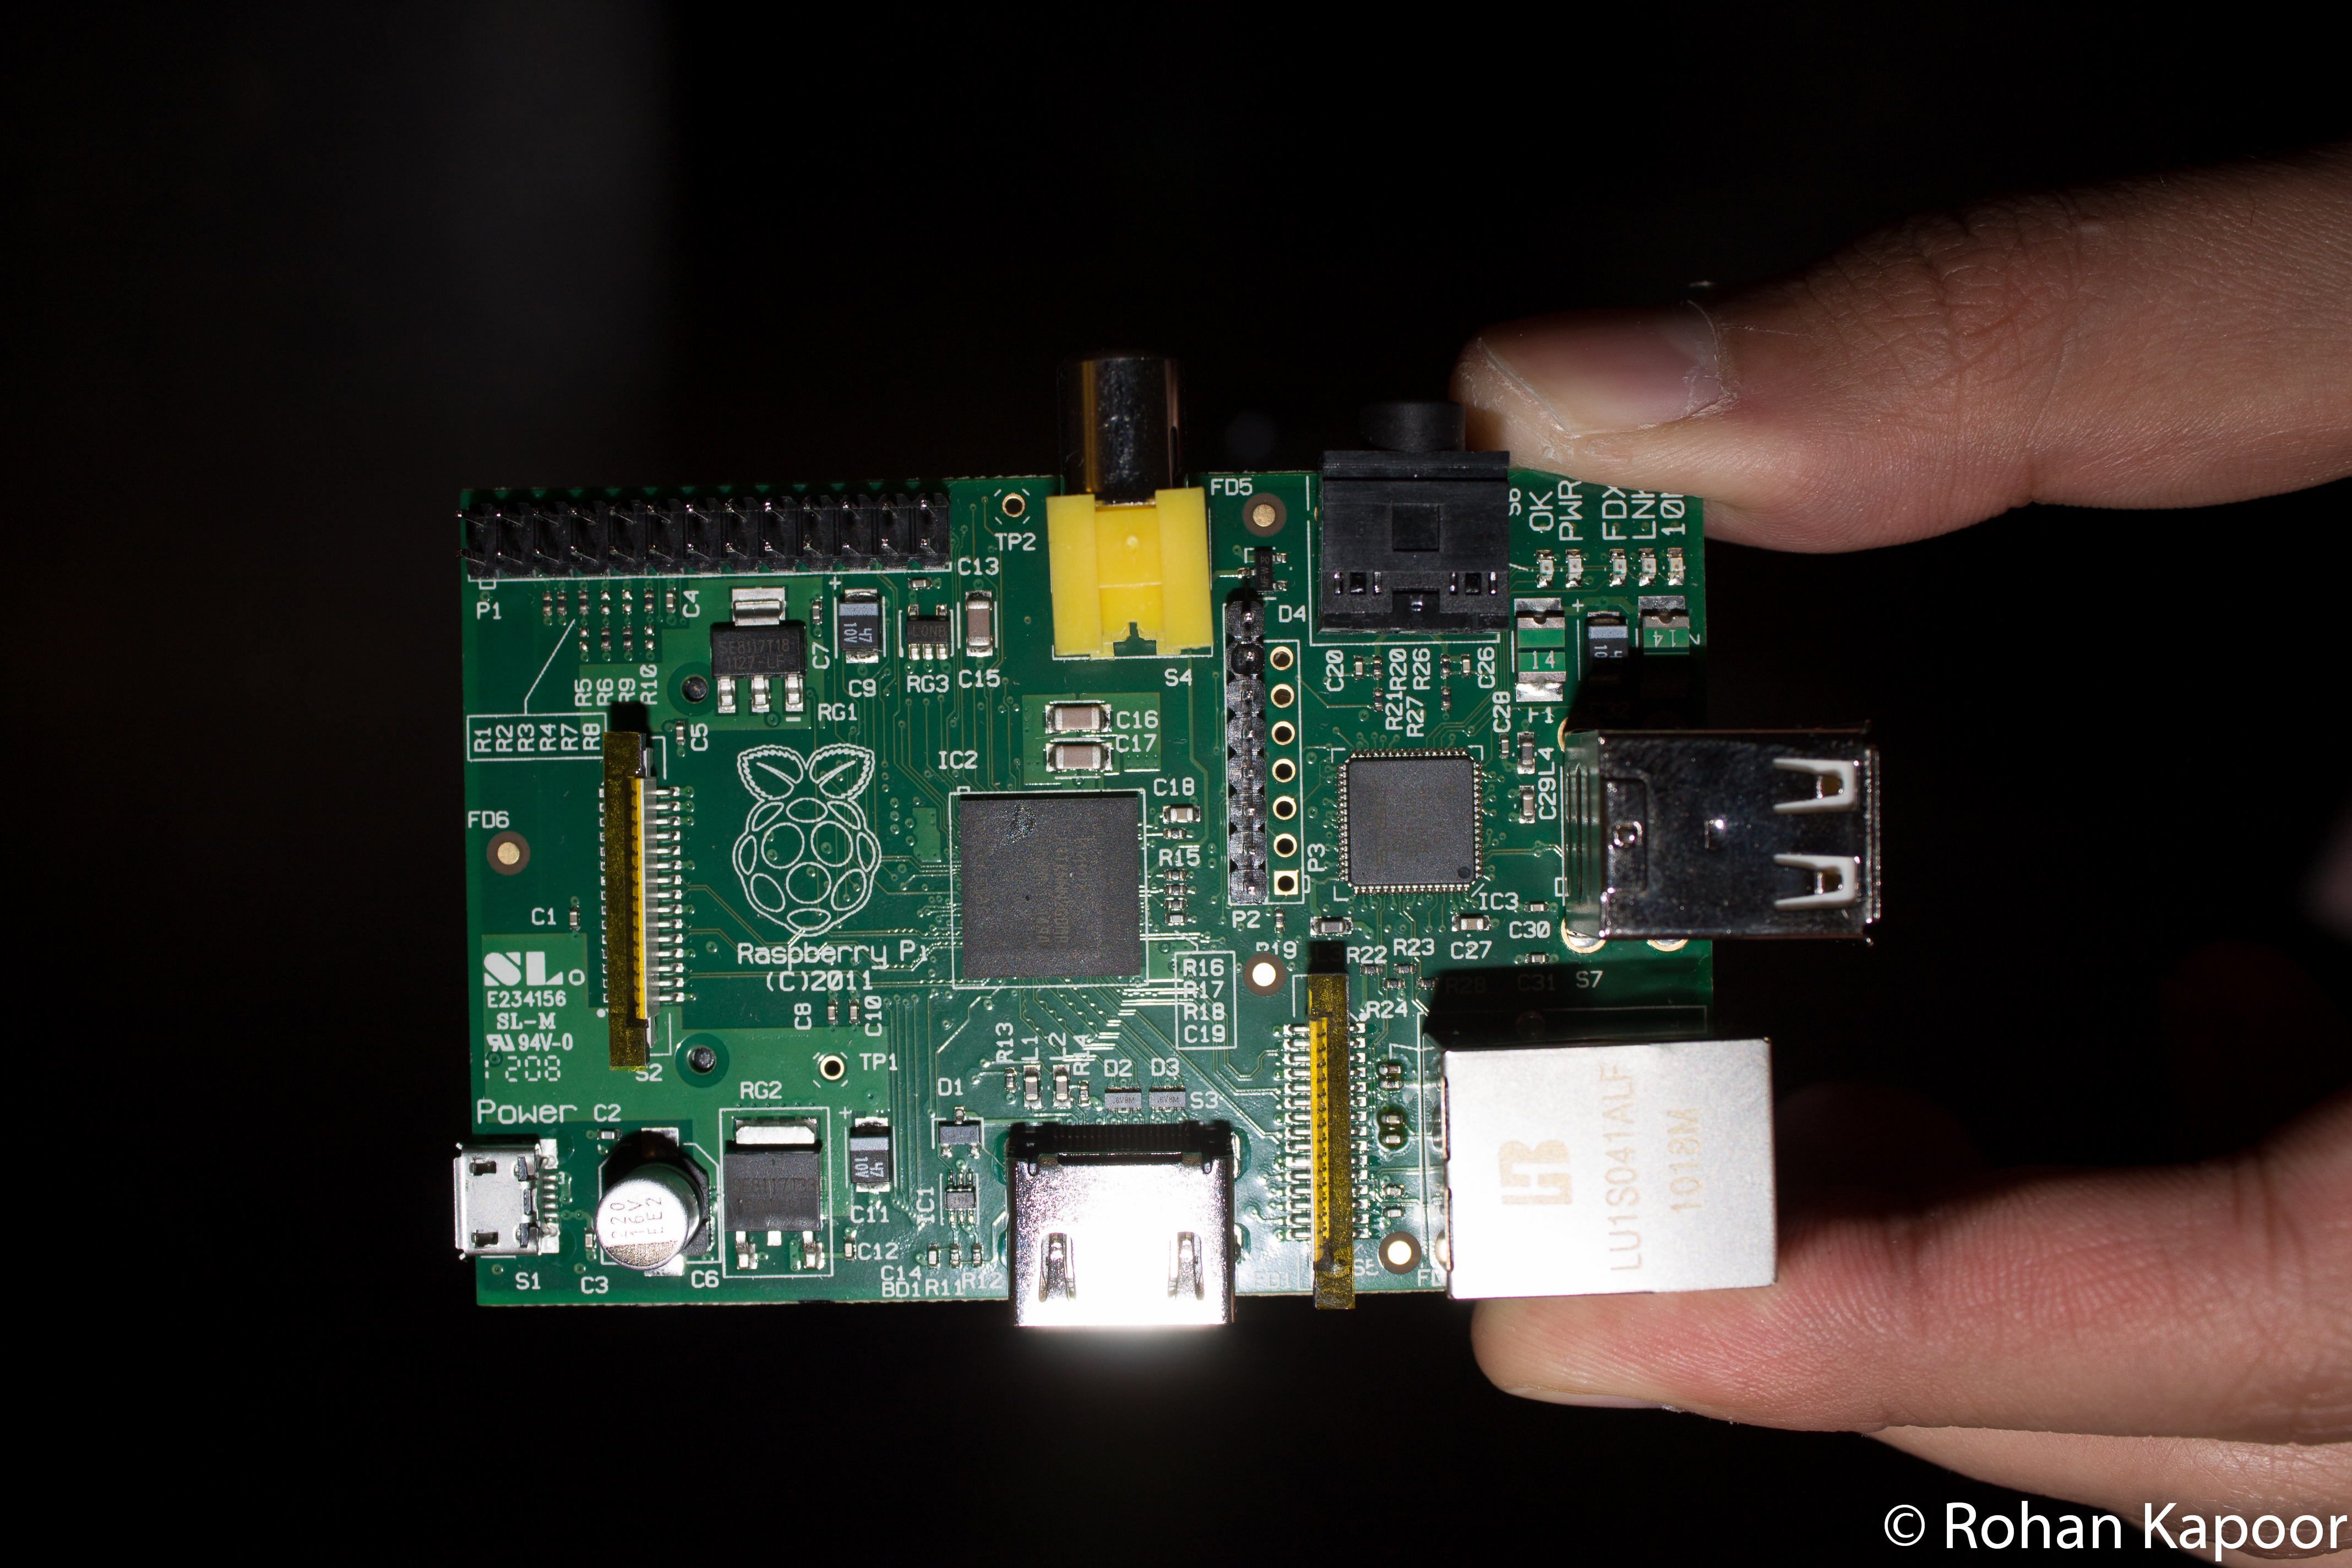
See below for a series of pictures of the Raspberry Pi and my setup!

Top View

Image 1 of 12